Inventory Management
- Warehouse Maintenance
- Receiving Goods into Warehouse
- Transferring Goods from Warehouses
- Issuing Goods from Warehouse for Projects
- Cancelling and Amending Stock Entries
- Returning Goods from Warehouse to Customers
- Stock Reconciliation
- Stock Reports
Warehouse Maintenance
A warehouse in SMURPS is regarded as a storage location
Create New Warehouse
Document Path: Stock > Settings > Warehouse
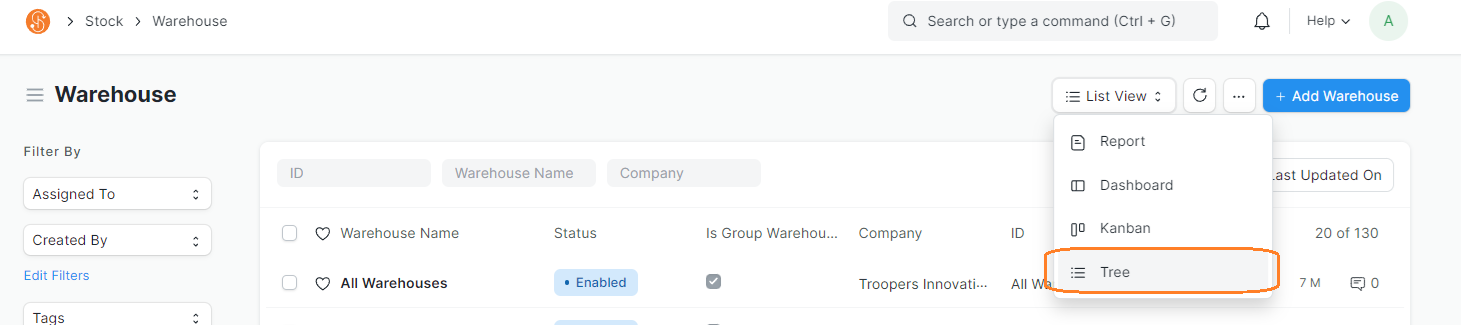
1. In the Warehouse screen, click on the List View > Tree. This is to change the Warehouse view to a Tree view.
Note: It is easier to create Warehouses via Tree View as it gives the user a better visualisation of the Warehouse Structure
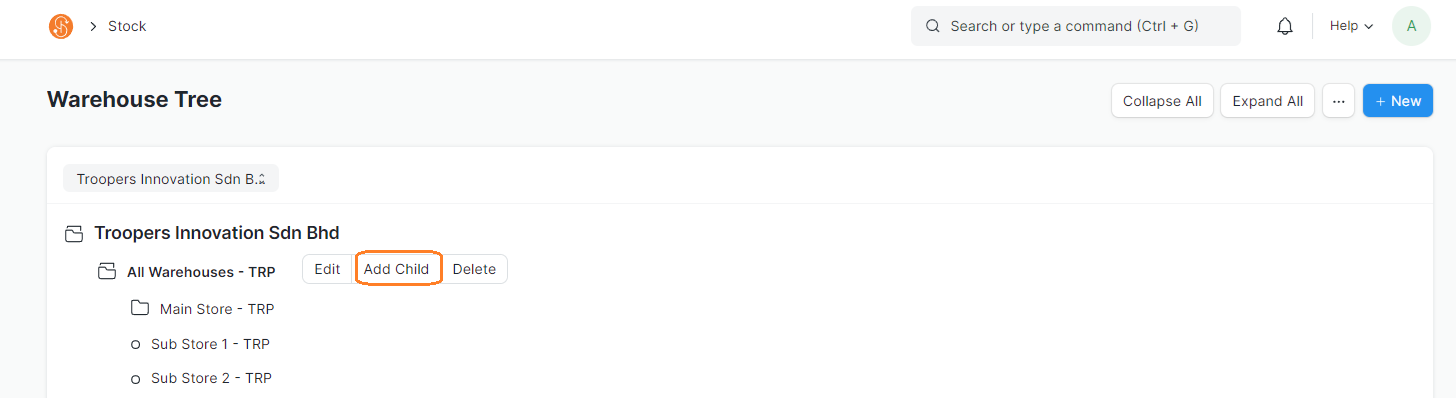
2. To create a new Warehouse, click on Add Child
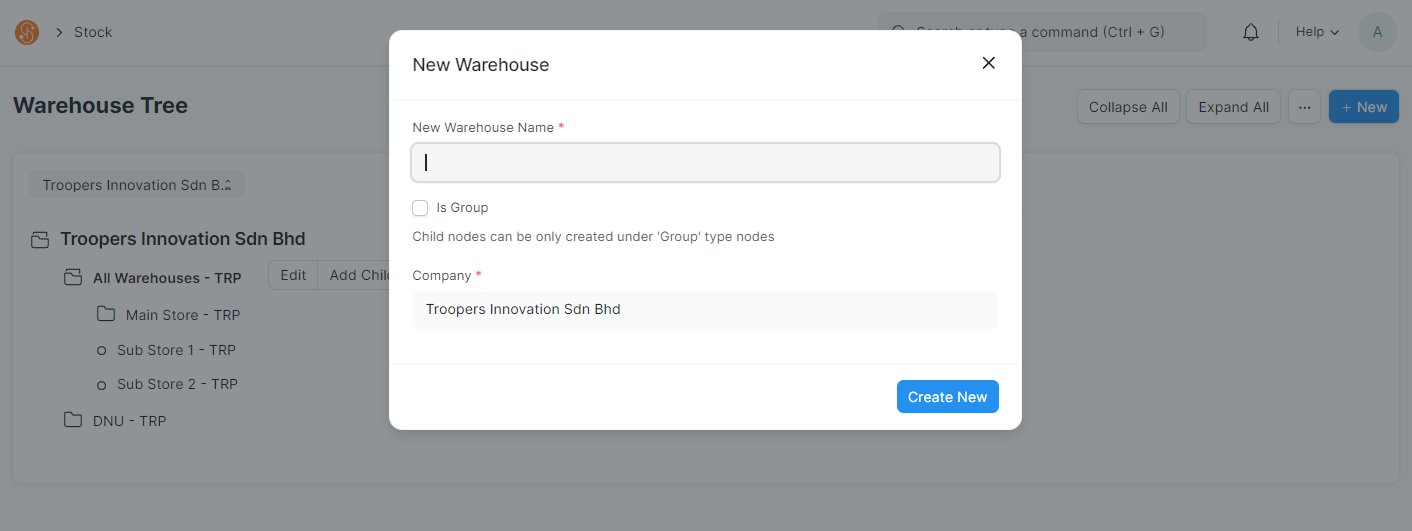
3. Enter the new Warehouse Name
- If you tick on 'Is Group', you can create sub-Warehouses under this group Warehouse.
- Do note that Group Warehouses cannot be selected when posting transactions, i.e. Stock Entry, Delivery Note
- Company is defaulted as your company
- Once confirmed, click Create New
4. Once a Warehouse is created, Warehouses are saved with their respective Company’s abbreviations (i.e. Sub Store - TRP). This facilitates identifying which Warehouse belongs to which company at a glance.
5. A folder represents a Parent Warehouse, and Child Warehouse
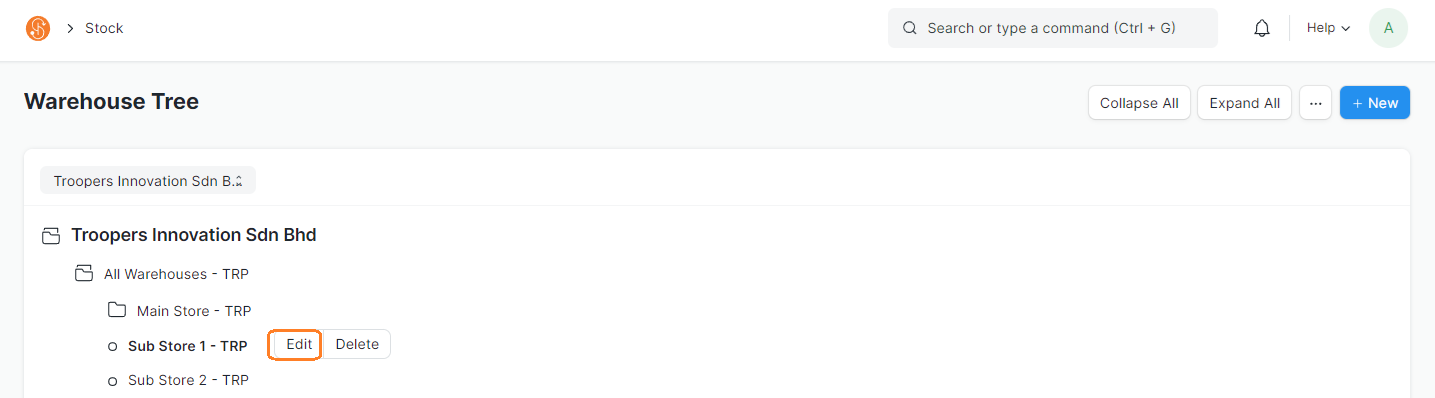
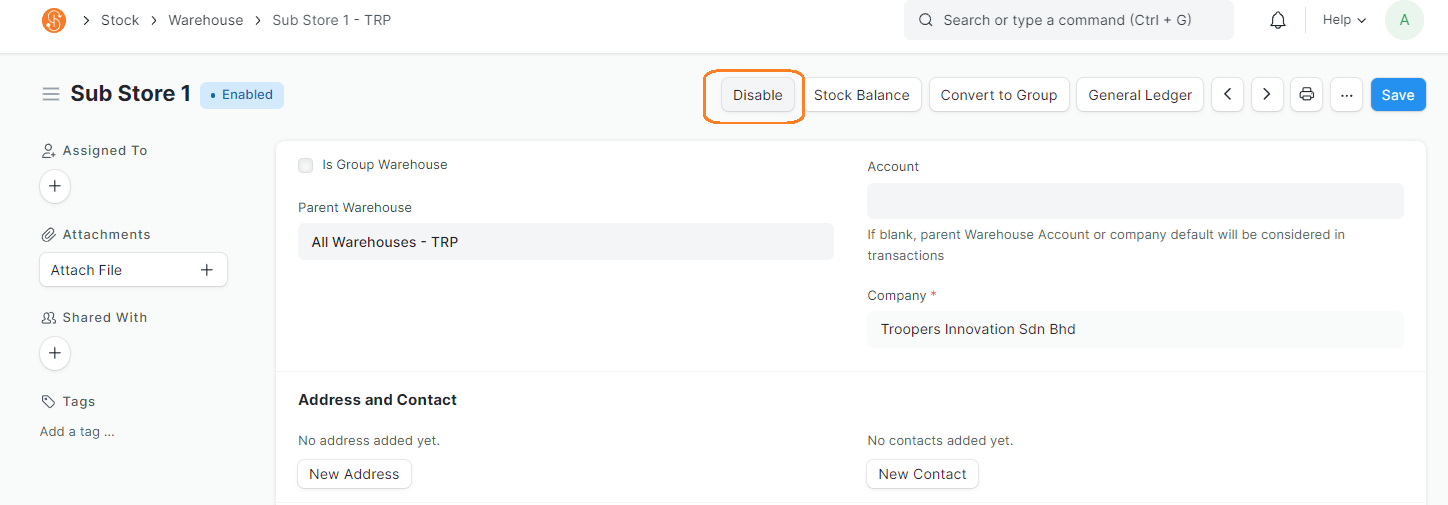
Edit Warehouse
1. To edit an Existing Warehouse, click on Edit. You may disable the Warehouse by clicking on Disable. However, do note that Warehouses with existing transactions cannot be deleted, but can be disabled
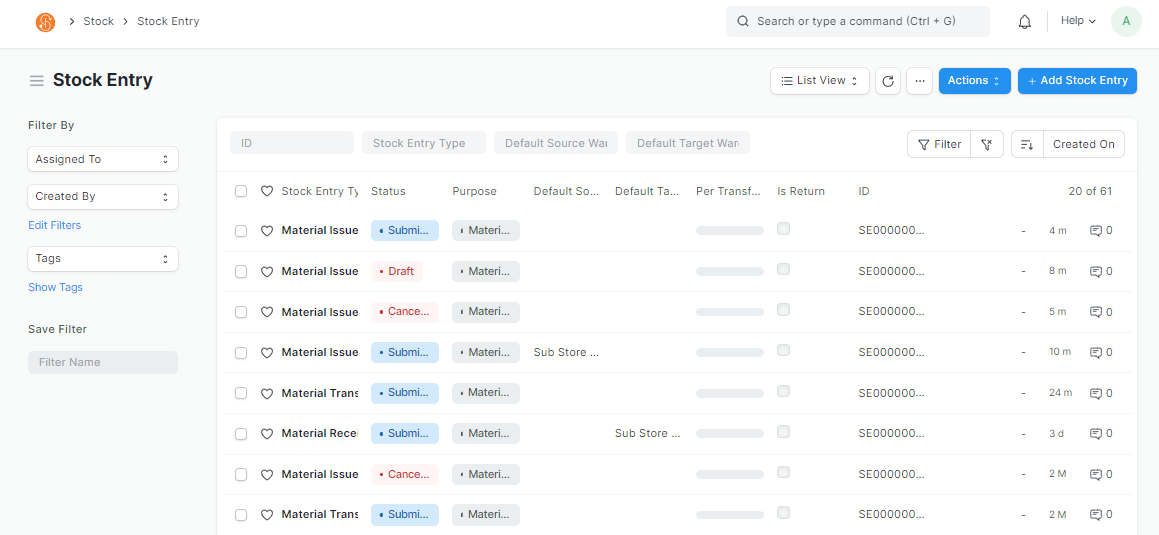
Receiving Goods into Warehouse
To receive customer provided goods into Trooper's Warehouse, you may do so via the Stock Entry function in SMURPS. Stock Entry lets you record Item movement between Warehouses. Stock Entry Material Receipt allows you to bring in stock into the system's warehouse
Prerequisites: Before creating a Stock Entry transaction, ensure the Item, Warehouse, Project, Customer and Employee are created.
Create New Stock Entry
Document Path: Stock > Stock Transactions > Stock Entry
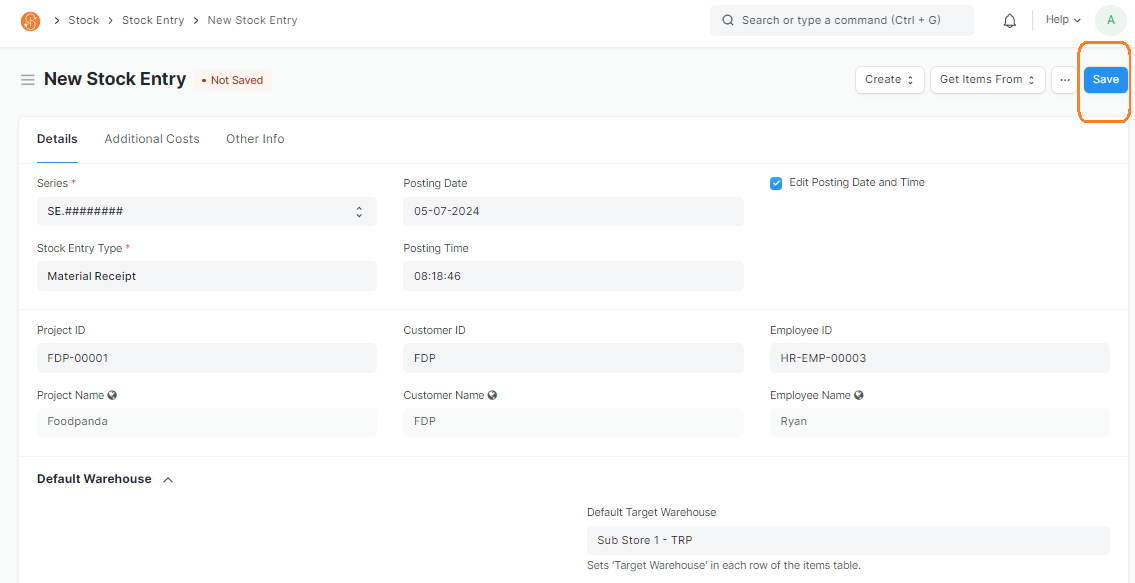
1. Go to Stock Entry List View and click Add Stock Entry

2. In the Stock Entry, choose the following
Note: Fields with a red asterisk indicates that it is Mandatory
- Series: Defaulted to SE.########
- Stock Entry Type: Material Receipt
- The purpose is if the material is being received (Incoming Material). The Items will be added to the Warehouse set under Target Warehouse field
- Posting Date: Set to current date
- Posting Time: Set to current time
- Edit Posting Date and Time: To edit the Posting Date and Time, tick this checkbox
- Project ID: Select Project Incoming Materials are brought for
- This is optional
- Customer ID: Select Customer Incoming Materials are brought for
- This is optional
- Employee ID: Select Employee ID that is in charge of bringing in the Incoming Materials
- This is optional
- Default Target Warehouse: If all Items are being brought into the same Warehouse (Storage Location), you may use the Default Target Warehouse field. When selecting this, it will auto-select the Target Warehouse in the Items table. If Items are bring brought into different Warehouses, you may select them in the Target Warehouse in the Item table
- Scan Barcode: You may select the Items to be brought in, by Scanning The Item Code QR Code
Note: Item's Item Code must be maintained in the Item's Barcode field
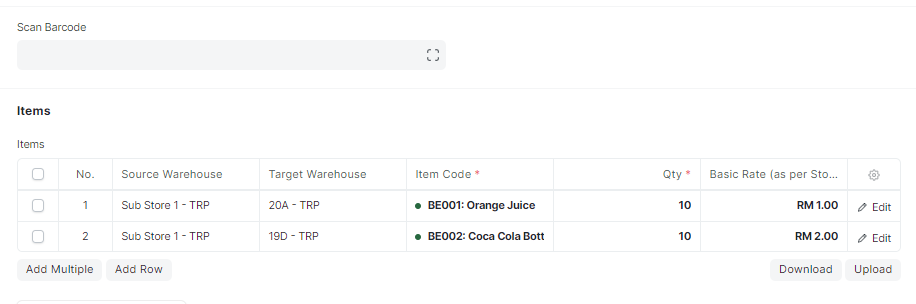
- Item Code: Items that are brought in can be selected in the Item Code field in the Items table
- Qty: Enter the quantity received. If Items are scanned via Scan Barcode, the Qty will adjust accordingly as per the no. of scans. However, the Qty can be adjusted manually as well
- Add Row: To add more line items in the Items table.
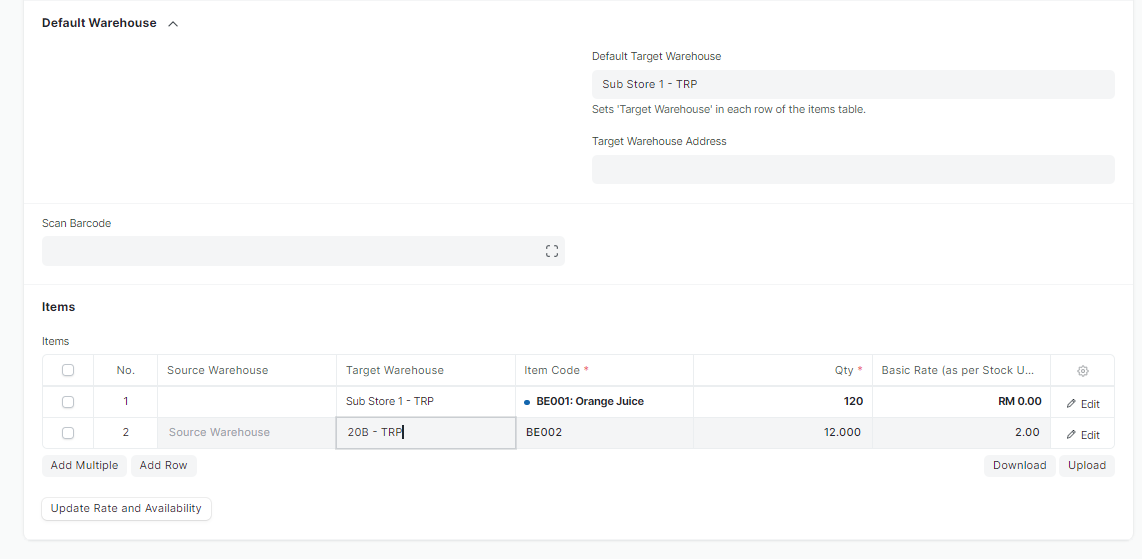
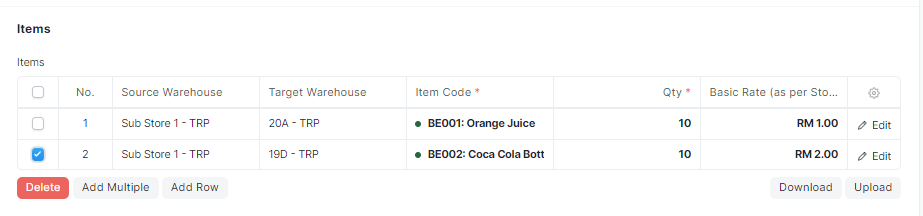
- To delete rows, check the checkbox on the left and a Delete button will appear. Click on the button to delete the row

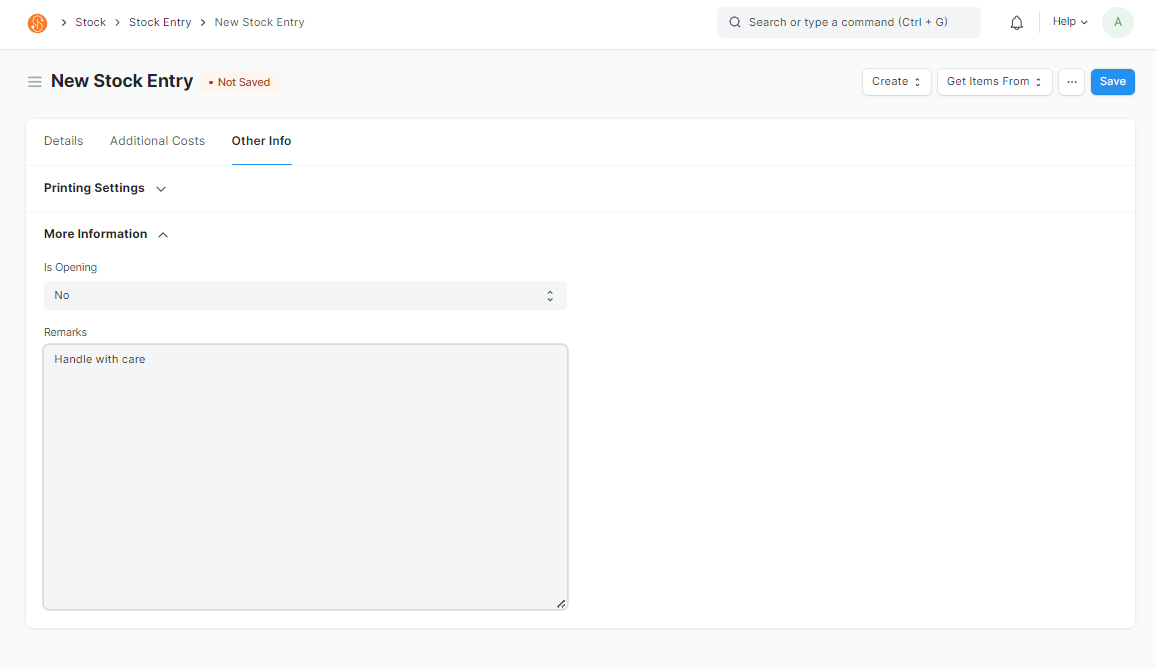
- Remarks: You have an option of adding in Remarks in the Stock Entry as well. Go to the Other Info Tab to find the Remarks field
3. Save Stock Entry by clicking on Save
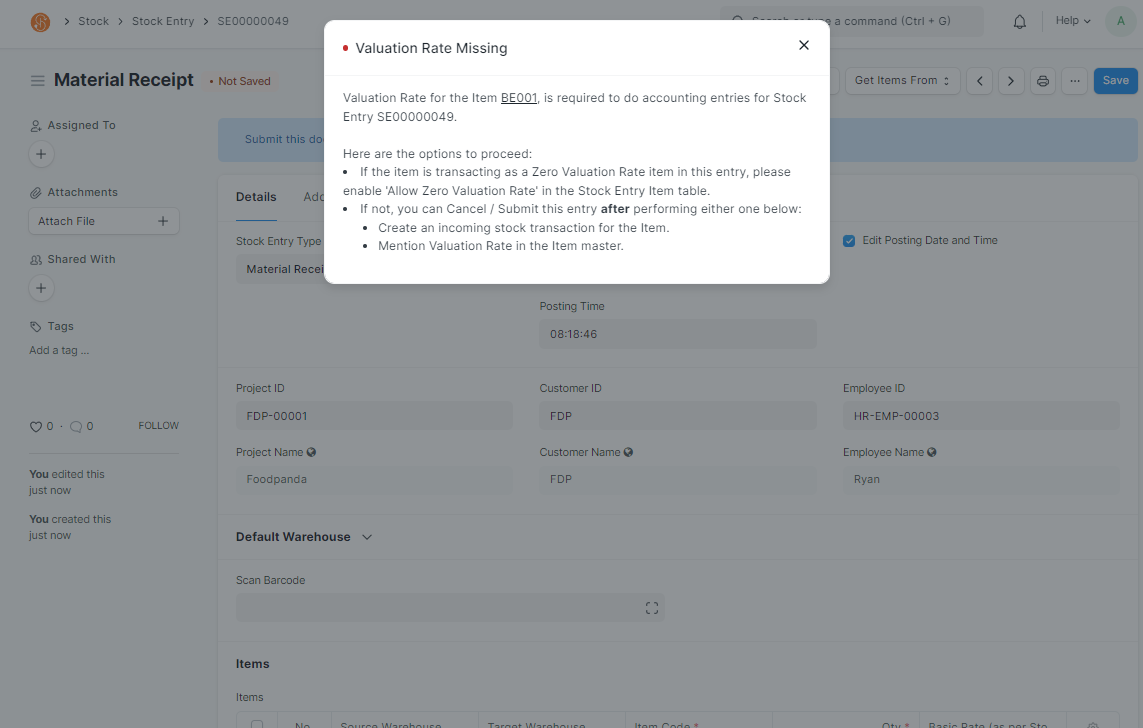
- If upon Save and a Valuation Rate Missing Error appears, it is indicating that the Item received does not have a Valuation Rate (Item Cost). To by-pass this error, you may either
- Enter the Item's Valuation Rate in the Basic Rate field in the Items Table
- Tick Allow Zero Valuation Rate checkbox in the Items Table. However this indicates that the item has Zero Valuation Rate
- If Stock Entry is successfully saved, the Stock Entry status will be changed to Draft and Stock Entry Document ID is created

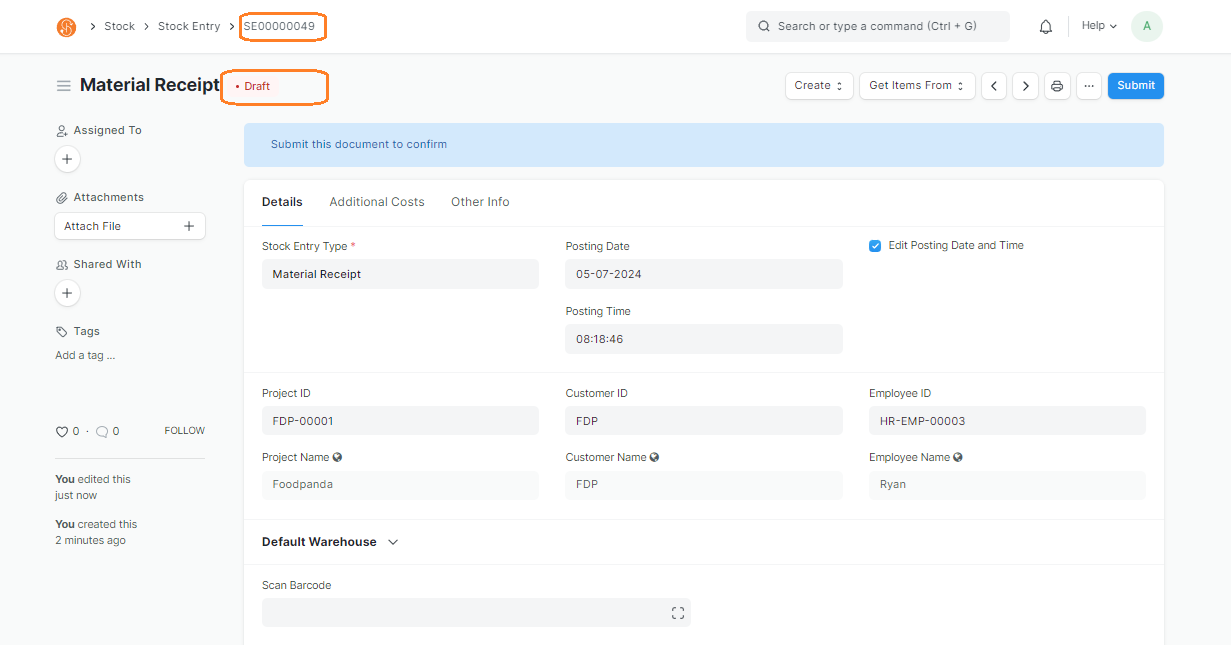
4. Submit Stock Entry once all information is confirmed
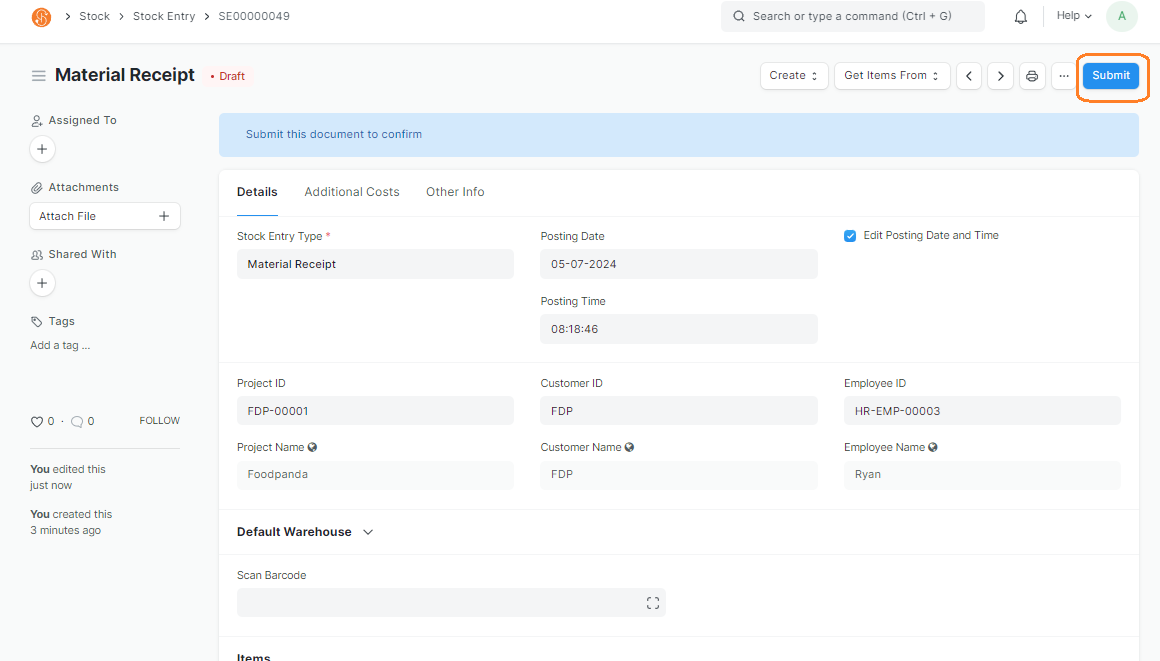
5. Once Stock Entry is submitted, the Stock Entry status will be changed to Submitted
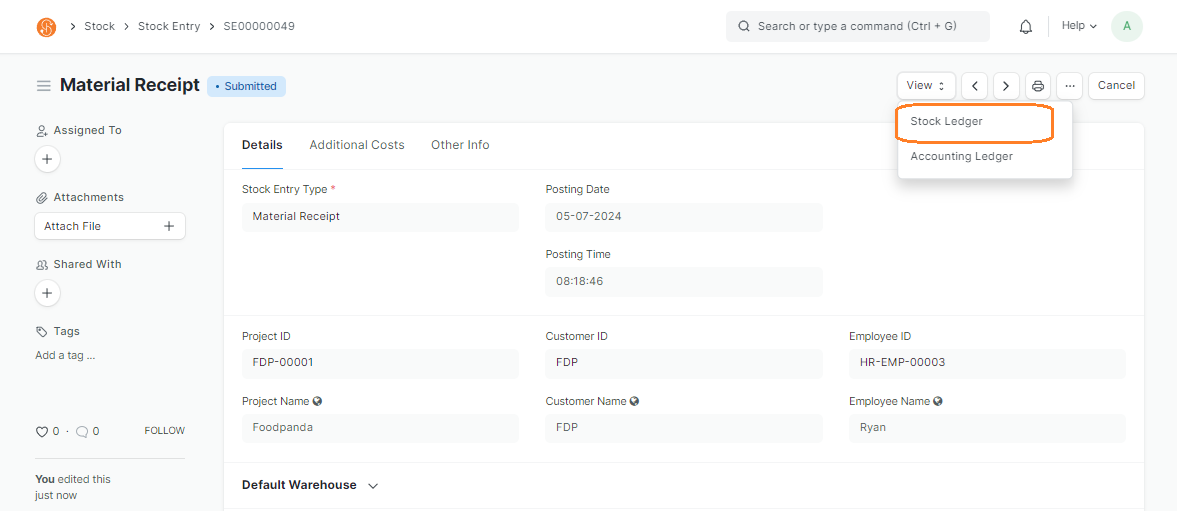
6. View > Stock Ledger to view the stock movement in the Targeted Warehouse
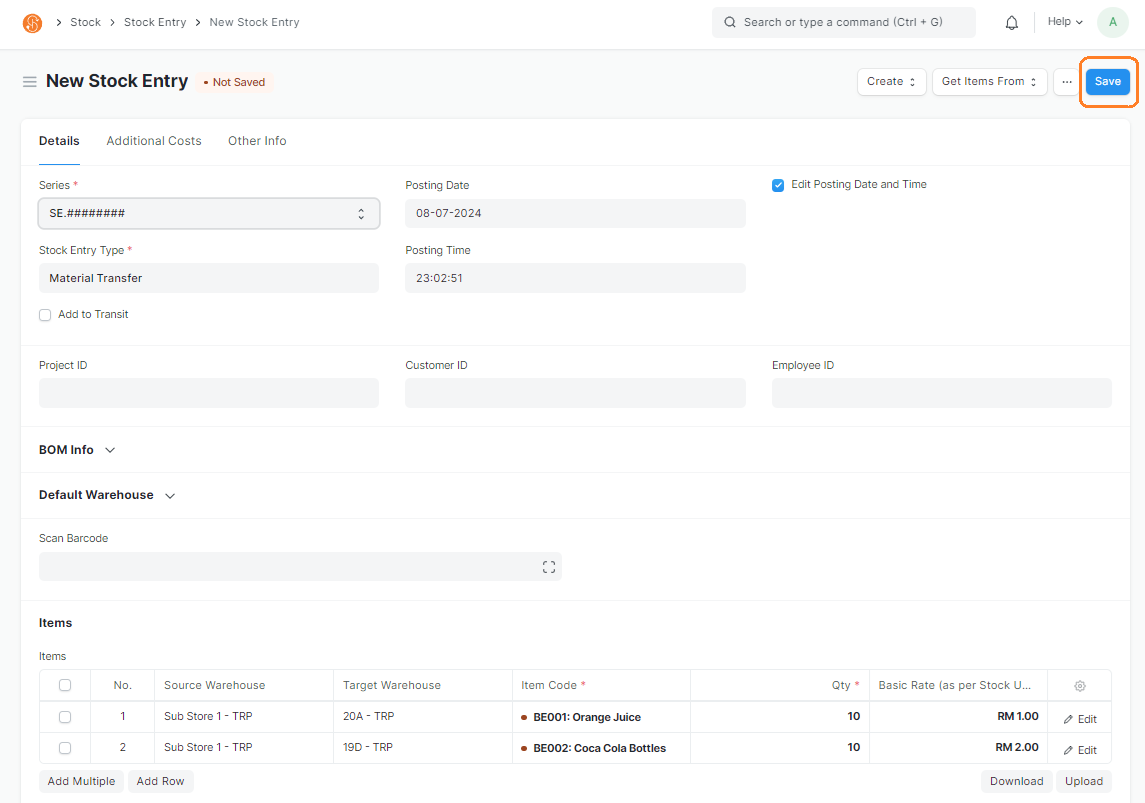
Transferring Goods from Warehouses
To transfer goods from different warehouses in the system, you may do so via Stock Entry function in SMURPS. The Stock Entry Types is a Material Transfer, which lets you record inter-transfers of items between existing warehouses in the system.
Prerequisites: Before creating a Stock Entry transaction, ensure the Item, Warehouse, Project, Customer and Employee are created.
Create New Stock Entry
Document Path: Stock > Stock Transactions > Stock Entry
1. Go to Stock Entry List View and click Add Stock Entry
2. In the Stock Entry, choose the following
Note: Fields with a red asterisk indicates that it is Mandatory
- Series: Defaulted to SE.########
- Stock Entry Type: Material Transfer
- If the material is being transferred from different warehouses in the system, for example if an item is transferred from different warehouse locations or racks in the warehouse. The Items will be issued out from the Source Warehouse and stock will be increase in the Target Warehouse
- Posting Date: Set to current date
- Posting Time: Set to current time
- Edit Posting Date and Time: To edit the Posting Date and Time, tick this checkbox
- Employee ID: Select Employee ID that is in charge of transferring the goods
- This is optional

- Default Source Warehouse: If all Items are being transferred from the same Warehouse (Storage Location), you may use the Default Source Warehouse field. When selecting this, it will auto-select the Source Warehouse in the Items table. If Items are issued out from different Warehouses, you may select them in the Source Warehouse in the Item table
- Default Target Warehouse: If all Items are being brought into the same Warehouse (Storage Location), you may use the Default Target Warehouse field. When selecting this, it will auto-select the Target Warehouse in the Items table. If Items are bring brought into different Warehouses, you may select them in the Target Warehouse in the Item table

- Scan Barcode: You may select the Items to be brought in, by Scanning The Item Code QR Code
Note: Item's Item Code must be maintained in the Item's Barcode field
- Item Code: Items that are transferred can be selected in the Item Code field in the Items table
- Qty: Enter the quantity being transferred. If Items are scanned via Scan Barcode, the Qty will adjust accordingly as per the no. of scans. However, the Qty can be adjusted manually as well
- Add Row Button: To add more line items in the Items table.
- To delete rows, check the checkbox on the left and a Delete button will appear. Click on the button to delete the row
- Remarks: You have an option of adding in Remarks in the Stock Entry as well. Go to the Other Info Tab to find the Remarks field
3. Save Stock Entry by clicking on Save
- If Stock Entry is successfully saved, the Stock Entry status will be changed to Draft and Stock Entry Document ID is created

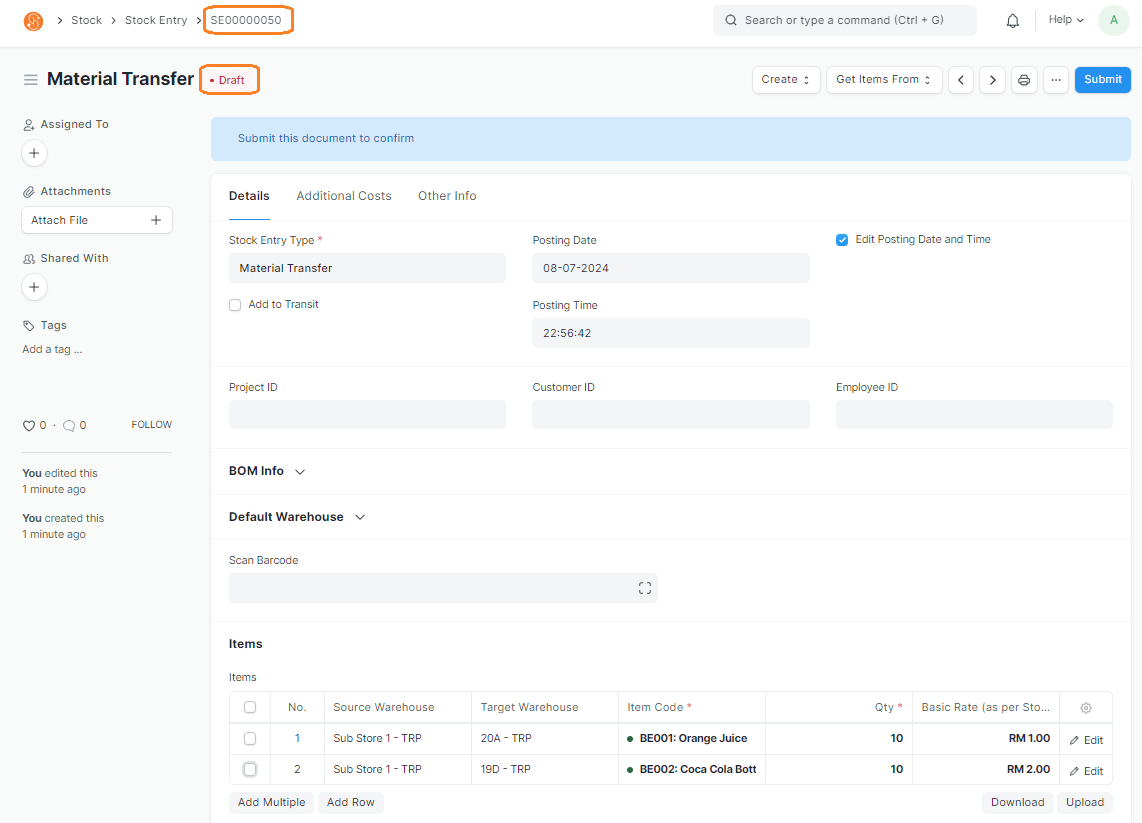
4. Submit Stock Entry once all information is confirmed
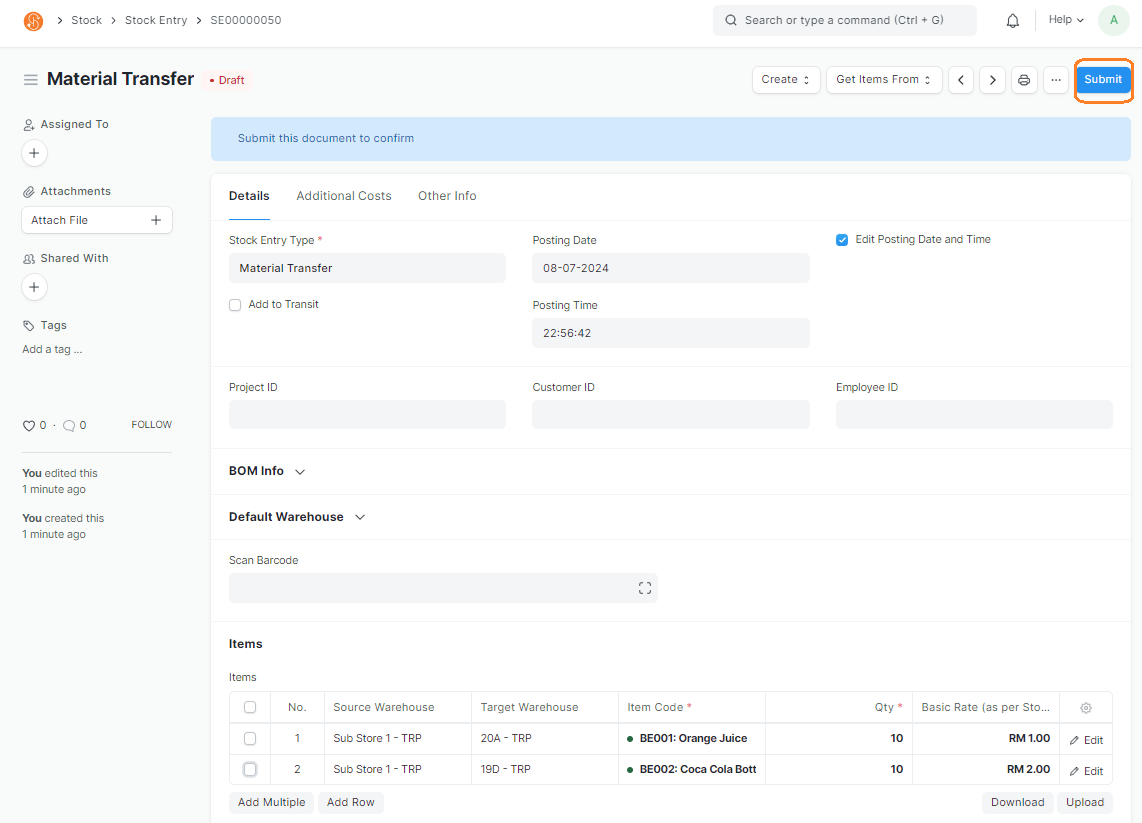
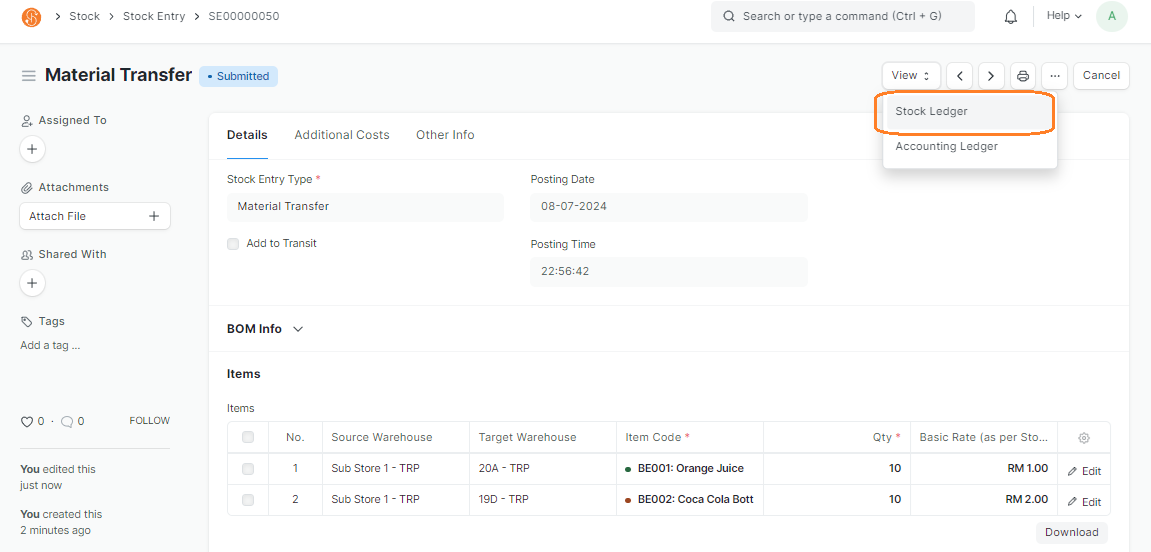
5. Once Stock Entry is submitted, the Stock Entry status will be changed to Submitted
6. View > Stock Ledger to view the stock movement in the Source and Targeted Warehouse
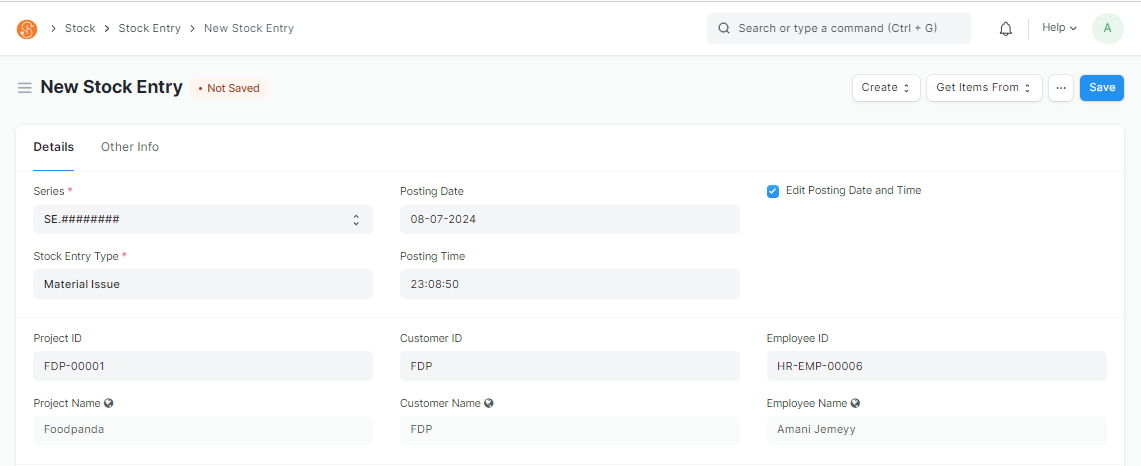
Issuing Goods from Warehouse for Projects
To issues out customer provided goods out of Trooper's Warehouse, you may do so via the Stock Entry function in SMURPS. Stock Entry Material Issue allows you to issue out stock from the system's warehouse. You may also keep track of which Project and Customer it is being issued out to.
Prerequisites: Before creating a Stock Entry transaction, ensure the Item, Warehouse, Project, Customer and Employee are created.
Create New Stock Entry
Document Path: Stock > Stock Transactions > Stock Entry
1. Go to Stock Entry List View and click Add Stock Entry
2. In the Stock Entry, choose the following
Note: Fields with a red asterisk indicates that it is Mandatory
- Series: Defaulted to SE.########
- Stock Entry Type: Material Issue
- The purpose is if the customer provided goods are being issued out from Trooper's Warehouse. The Items will be issued out from the Warehouse set under Source Warehouse field
- Posting Date: Set to current date
- Posting Time: Set to current time
- Edit Posting Date and Time: To edit the Posting Date and Time, tick this checkbox
- Project ID: Select Project goods are being issued out for
- This is optional
- Customer ID: Select Customer goods are being issued out for
- This is optional
- Employee ID: Select Employee ID that is in charge of issuing out the goods
- This is optional
- Default Source Warehouse: If all Items are being issued out from the same Warehouse (Storage Location), you may use the Default Source Warehouse field. When selecting this, it will auto-select the Source Warehouse in the Items table. If Items are issued out from different Warehouses, you may select them in the Source Warehouse in the Item table

- Scan Barcode: You may select the Items to be brought in, by Scanning The Item Code QR Code
Note: Item's Item Code must be maintained in the Item's Barcode field
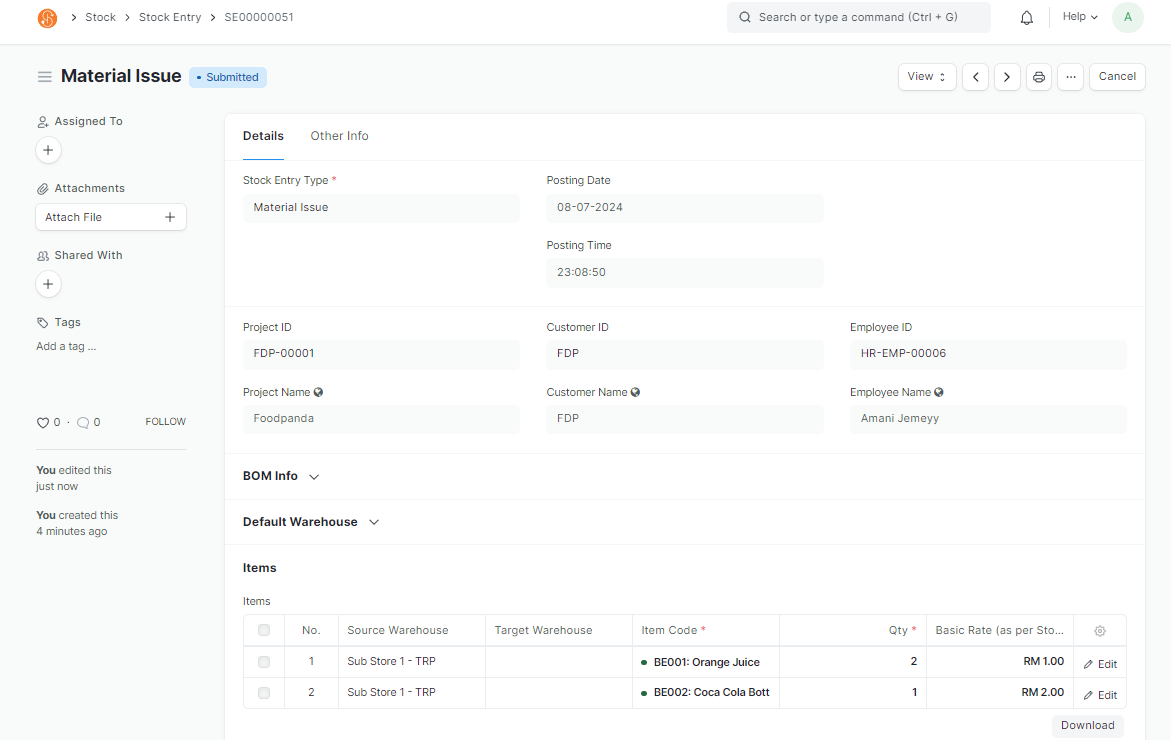
- Item Code: Items that are issued out can be selected in the Item Code field in the Items table
- Qty: Enter the quantity received. If Items are scanned via Scan Barcode, the Qty will adjust accordingly as per the no. of scans. However, the Qty can be adjusted manually as well
- Add Row: To add more line items in the Items table.

- To delete rows, check the checkbox on the left and a Delete button will appear. Click on the button to delete the row
- Remarks: You have an option of adding in Remarks in the Stock Entry as well. Go to the Other Info Tab to find the Remarks field
3. Save Stock Entry by clicking on Save

If Stock Entry is successfully saved, the Stock Entry status will be changed to Draft and Stock Entry Document ID is created
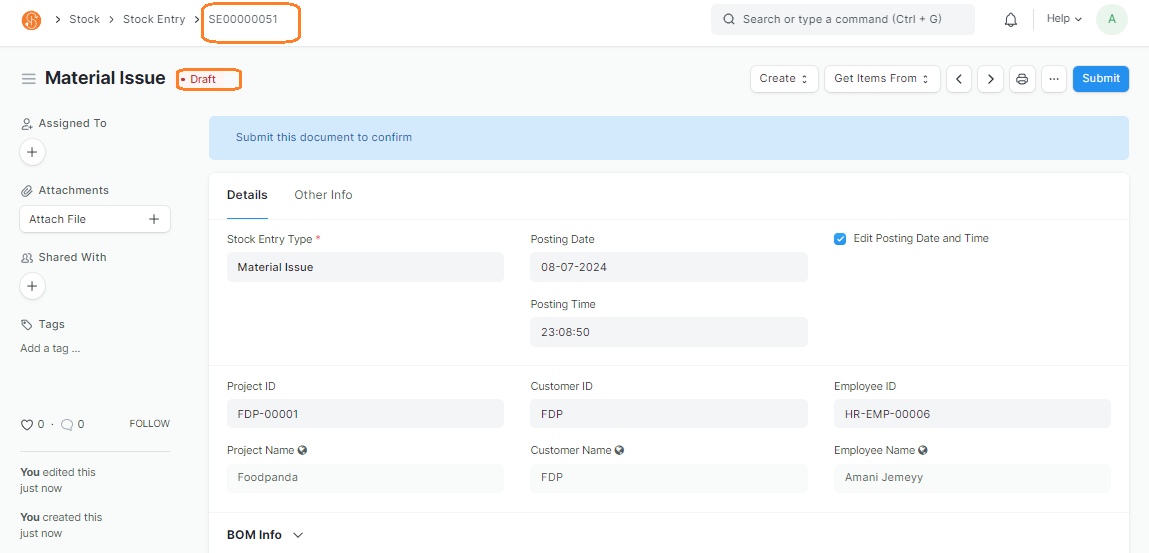
4. Submit Stock Entry once all information is confirmed by clicking on Submit
5. Once Stock Entry is submitted, the Stock Entry status will be changed to Submitted
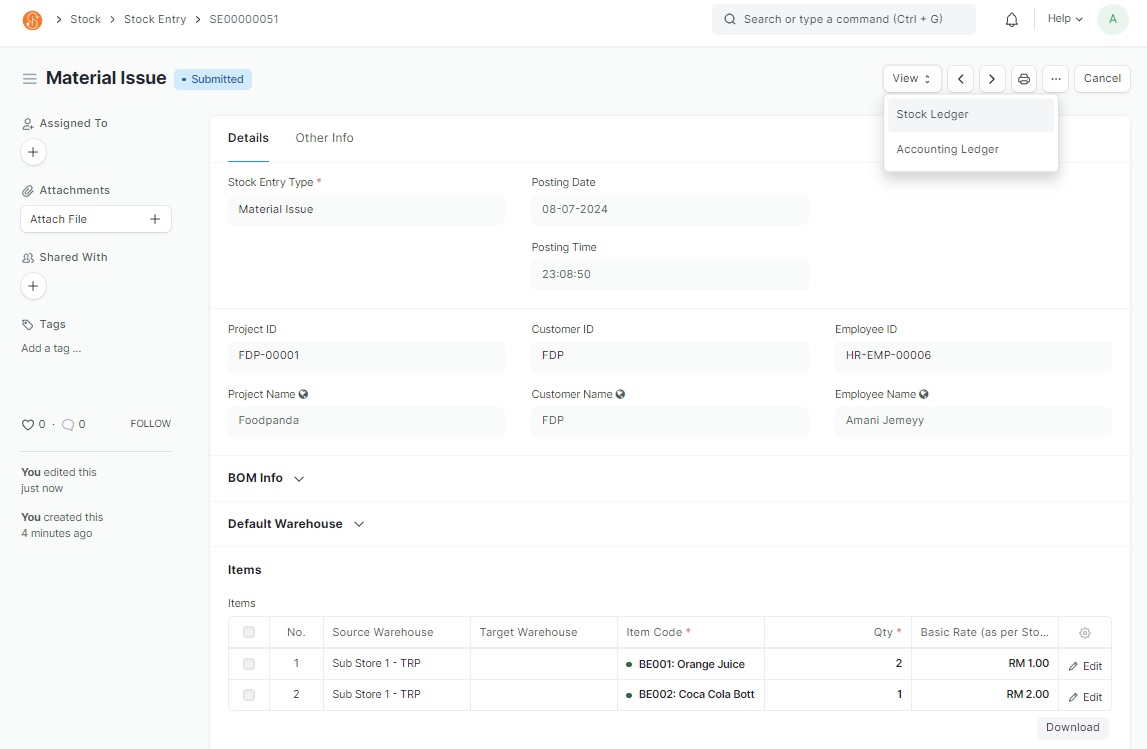
6. View > Stock Ledger to view the stock movement from the Source Warehouse
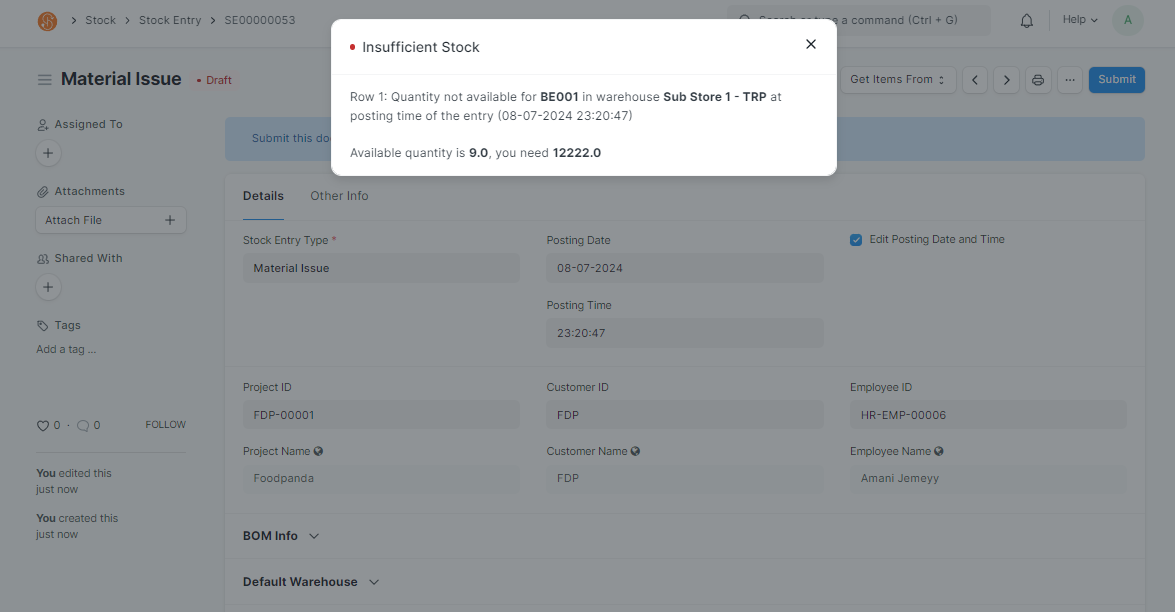
Note: If you faced the error below, it indicates that there is insufficient stock in the Source Warehouse. To by-pass this error, stock must be brought into the Warehouse. This checking in the system also shows control for any insufficient stock in the system
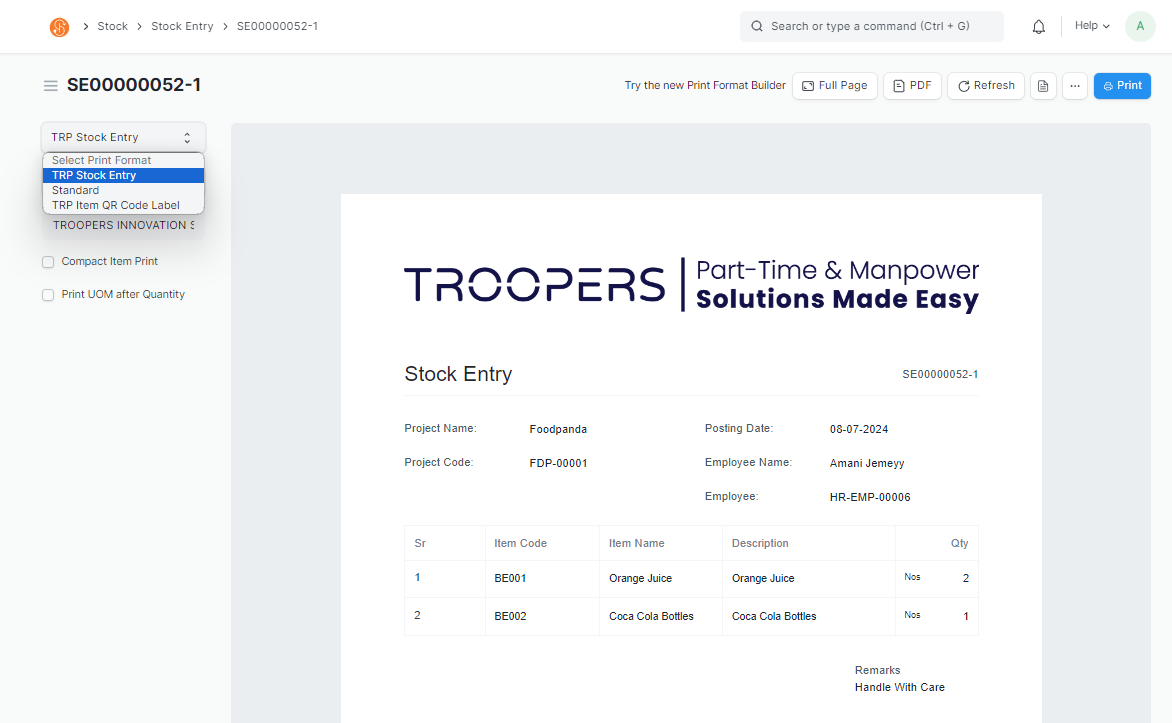
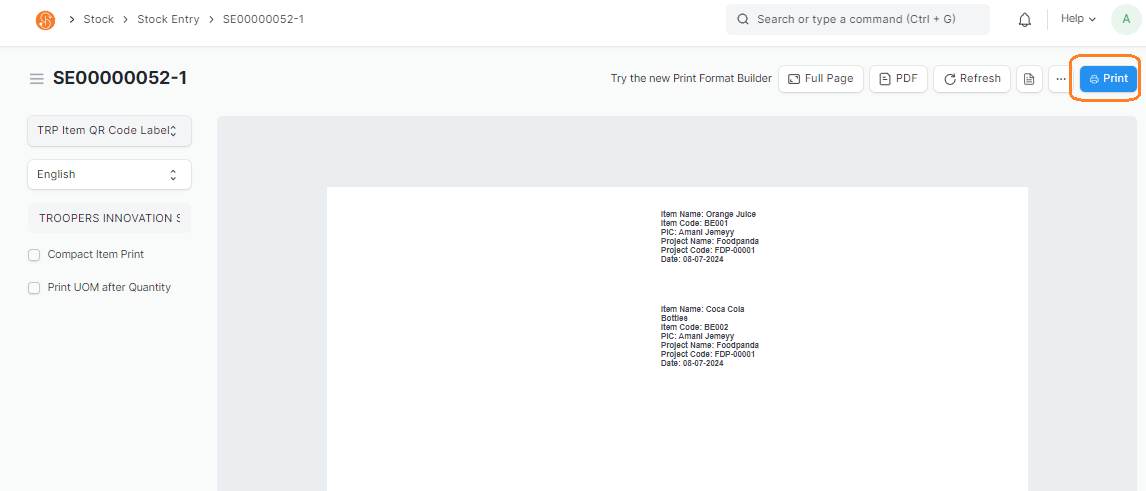
7. Print out QR Code Labels and Issue Form by clicking on Print
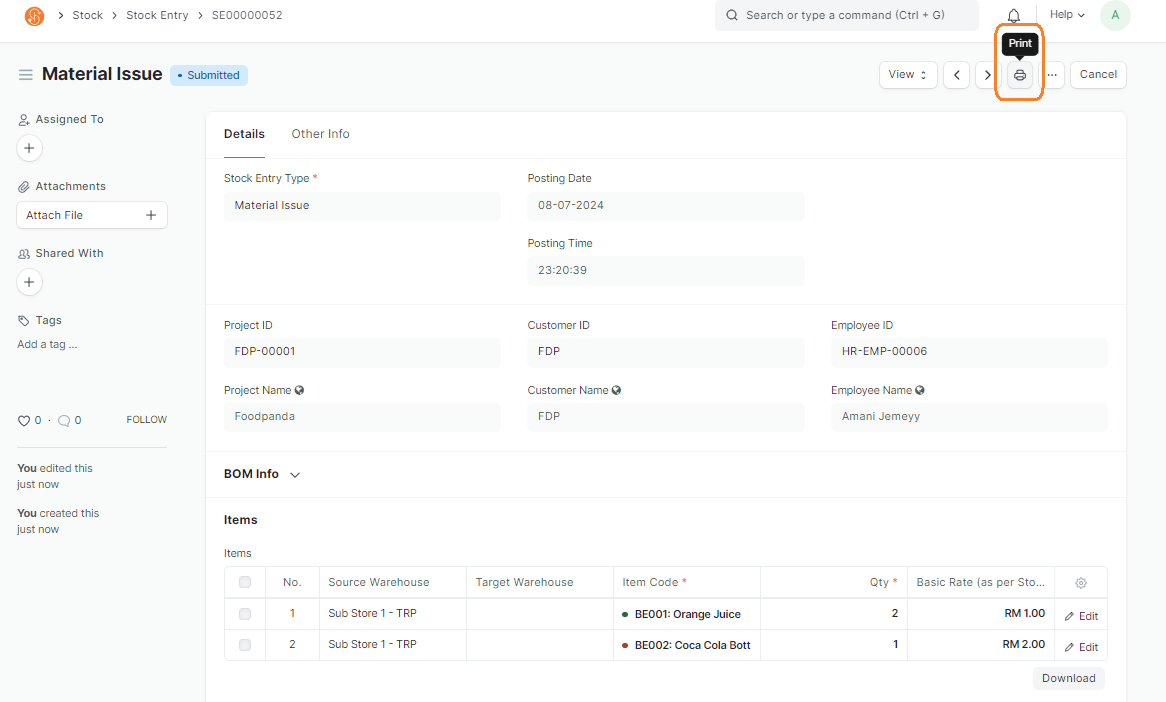
8. In the Print view, you may select the Print Format
- TRP Stock Entry: To print out the issue form, select this Print Format. This is to print out a copy of the issue form, which will indicate the Items, Project, Employee and Remarks
- TRP Item QR Code Label: To print out labels with QR Codes for each issued item. This can be pasted on the physical issued goods for tracking
- To print, click on Print button
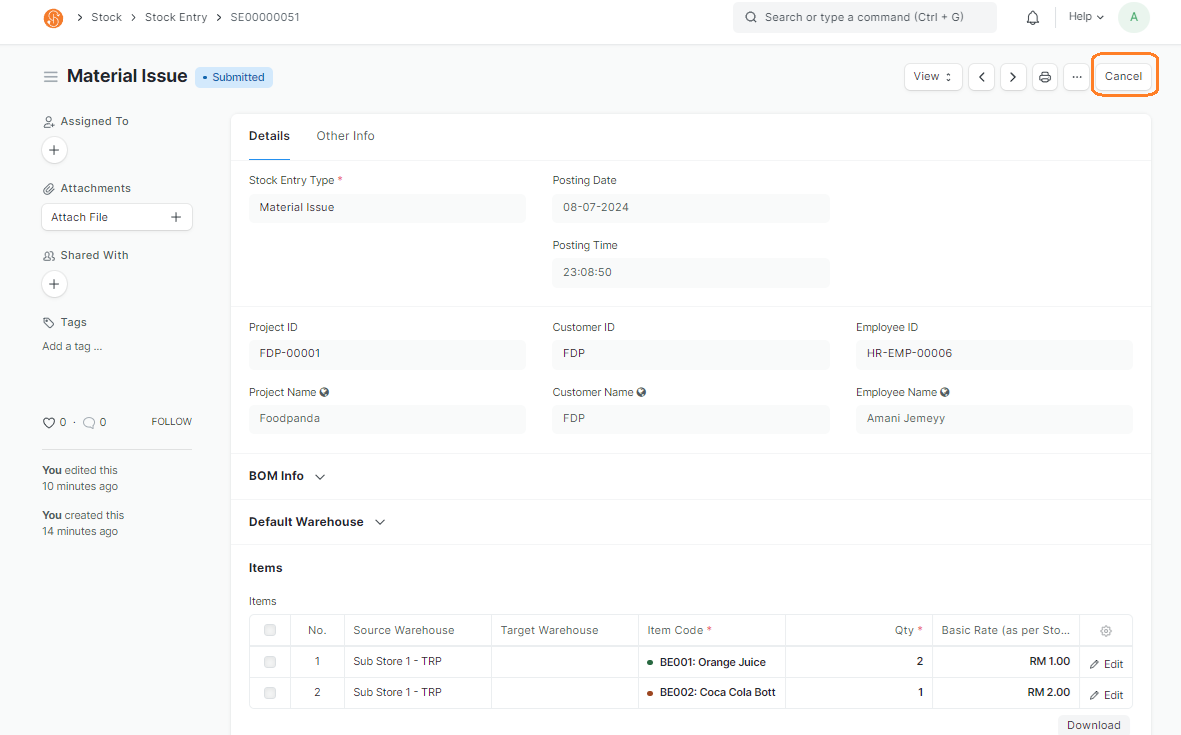
Cancelling and Amending Stock Entries
This guide shows you how to cancel a Stock Entry in the system. Cancellation of Stock Entries are usually due to errors in the submitted Stock Entry document, i.e. wrong date, Employee or quantity was set
Document Path: Stock > Stock Transactions > Stock Entry
1. Go to Stock Entry List View and select the Submitted Stock Entry that needs to be cancelled. Do note that only Submitted Stock Entries can be cancelled
2. In the Stock Entry, click on Cancel
3. Once Cancelled, Stock Entry status will change to Cancelled. The stock movement will also be reverted in the system. For example if an Item is issued out from a warehouse, upon cancel the stock of that item will increase accordingly. Upon cancellation, the Amend will also appear, allowing users to amend if needed.
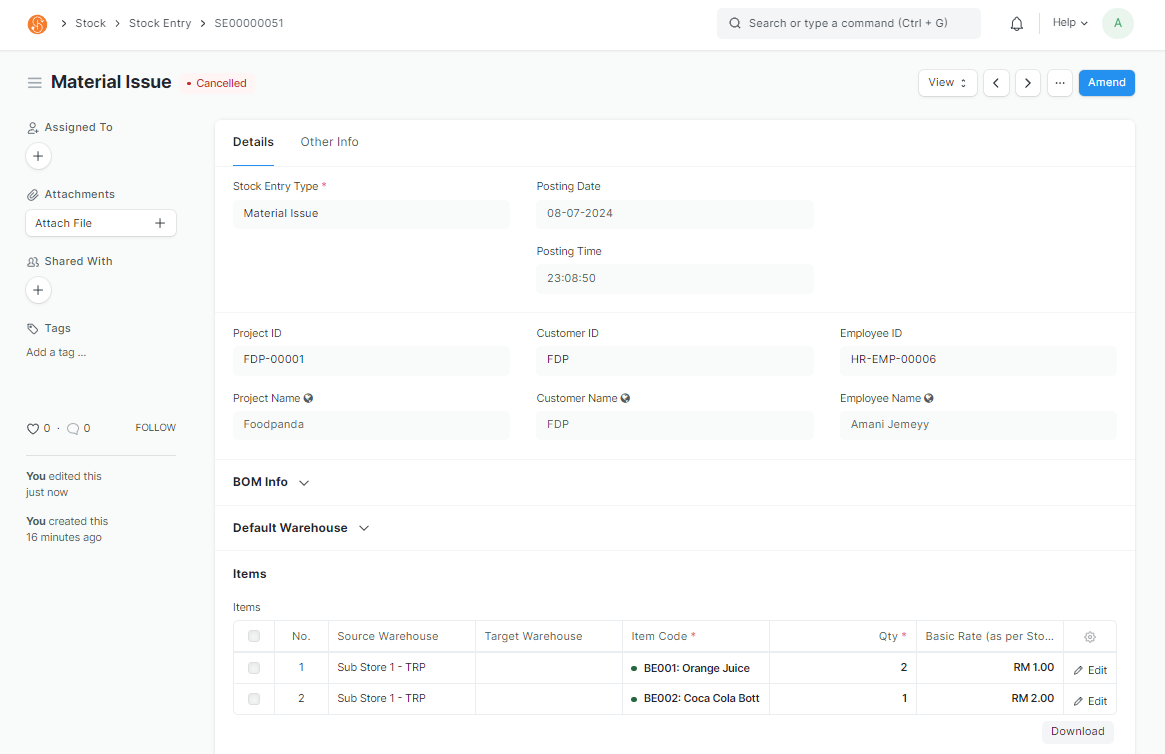
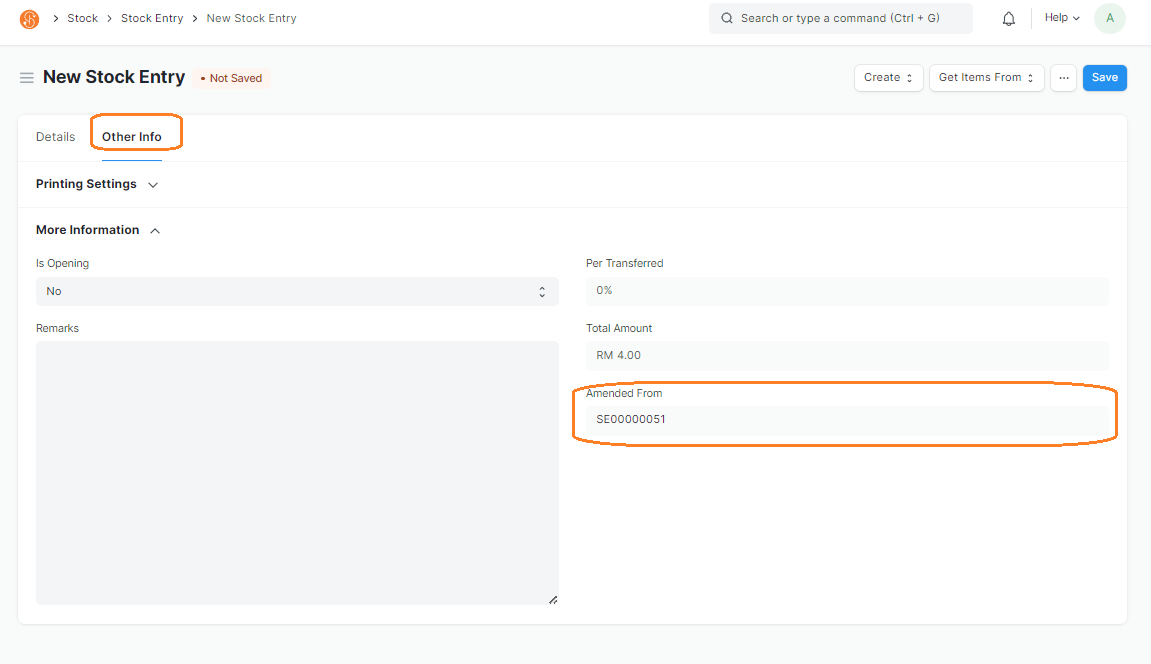
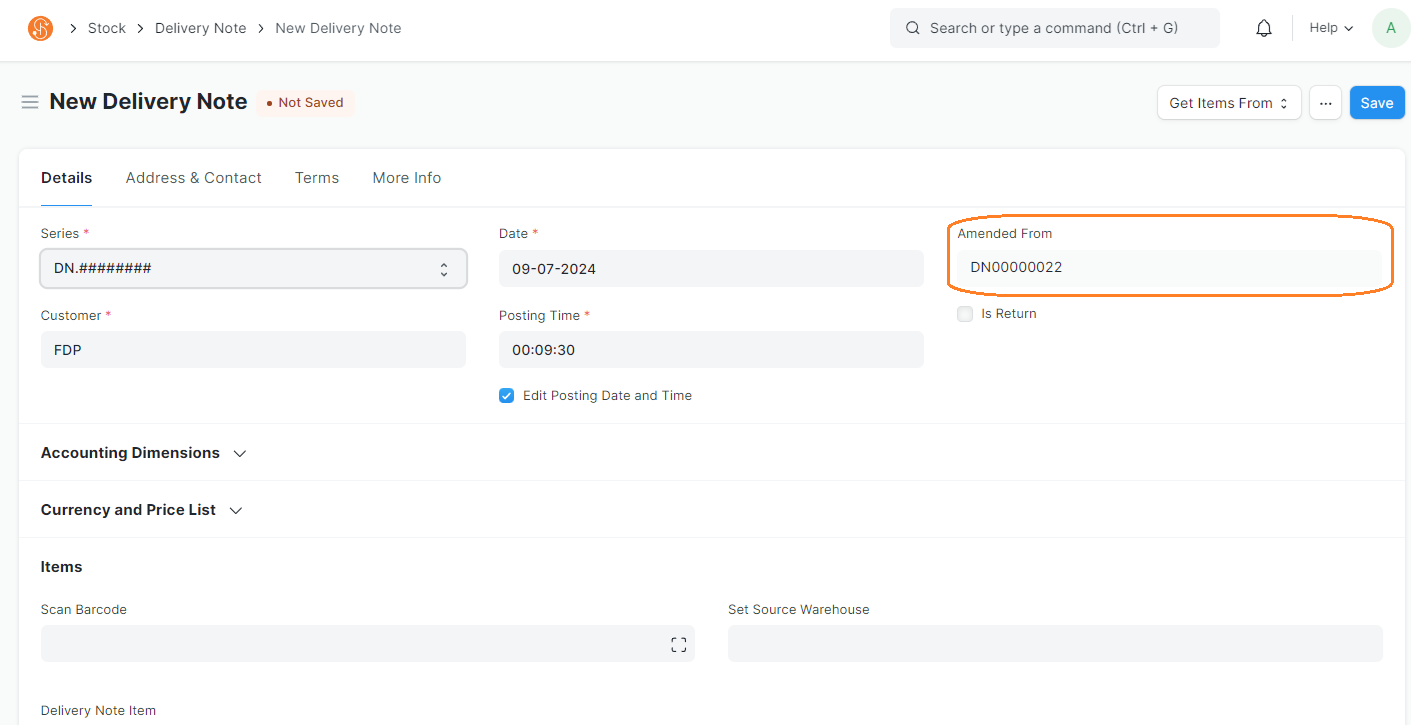
4. To amend a cancelled Stock Entry, click on Amend. This will navigate you to a new screen to adjust the Stock Entry. In the screen, information from the cancelled Stock Entry will be copied over to a New Stock Entry screen
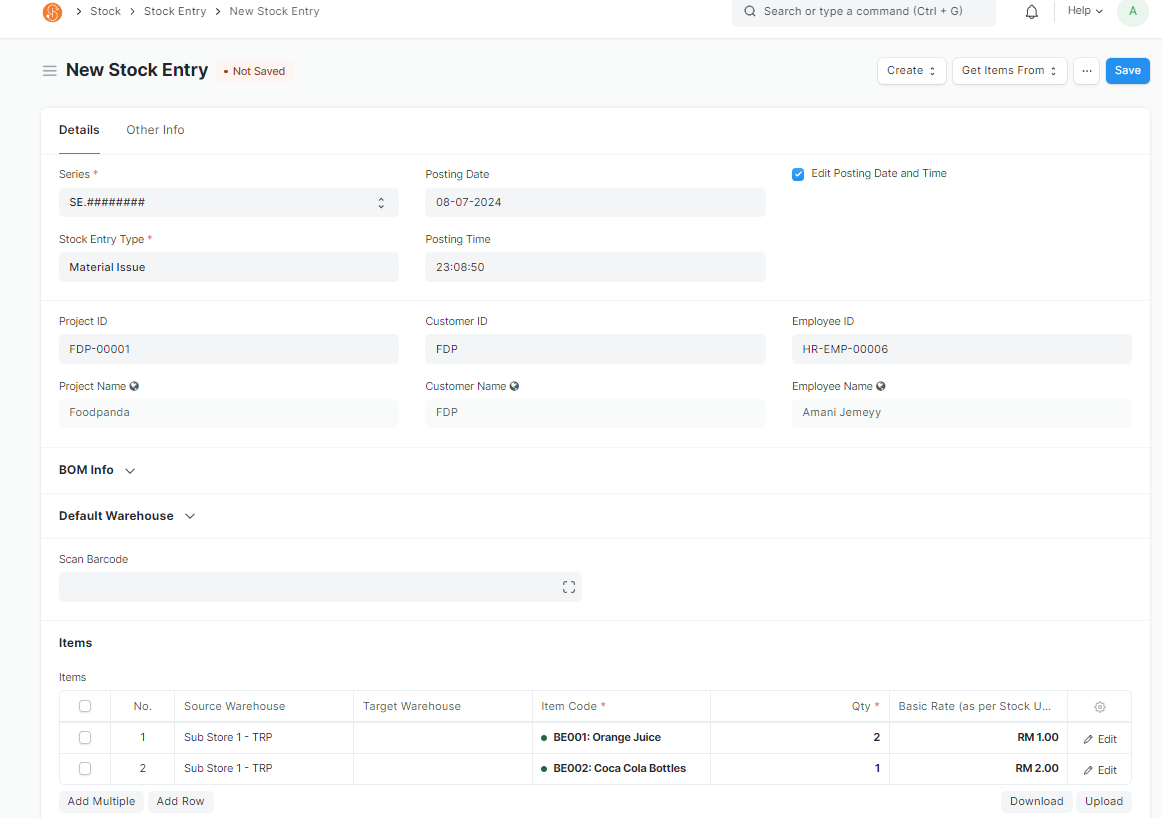
- The system links the new Stock Entry with the Original Stock Entry, which can be seen under Other Info Tab >Amended From field
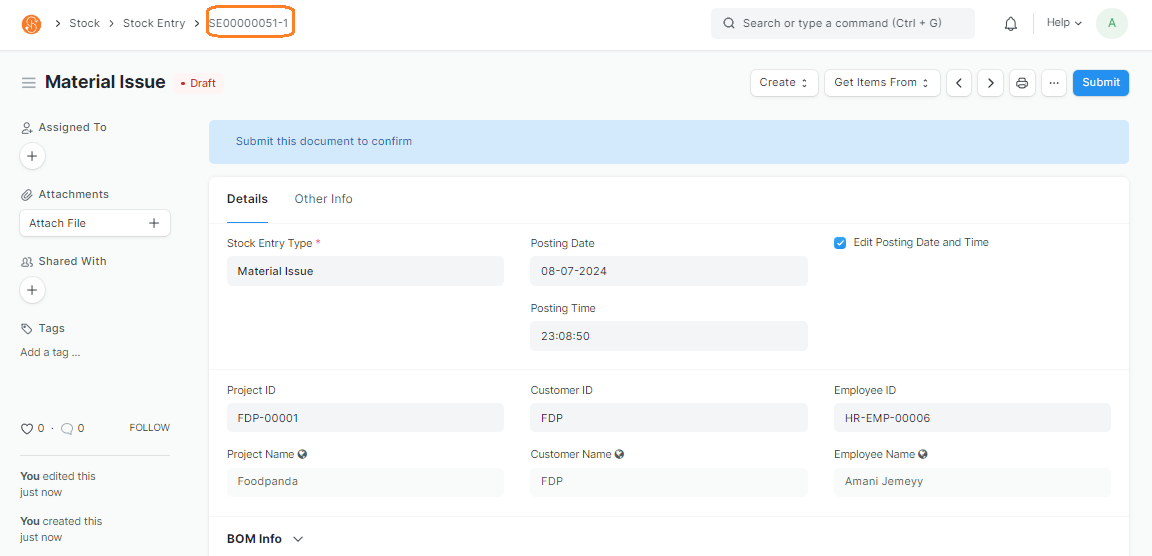
5. Once you've adjusted the necessary information and saved the new Stock Entry by clicking on Save, the Stock Entry status will change to Draft and the Stock Entry ID will be generated with a revision number. The revision number indicates the number of times the document is revised
6. Continue to Submit the Stock Entry as per the steps in the Stock Entry guide
Returning Goods from Warehouse to Customers
To return customer provided goods to Customers out of Trooper's Warehouse, you may do so via the Delivery Note function in SMURPS. Delivery Note allows you to issue out stock form the system's warehouse. Delivery Notes also allow you to link the document with the Customer it is being issued out to.
Prerequisites: Before creating a Delivery Note transaction, ensure the Item, Warehouse and Customer is created.
Create New Delivery Note
Document Path: Stock > Stock Transactions > Delivery Note
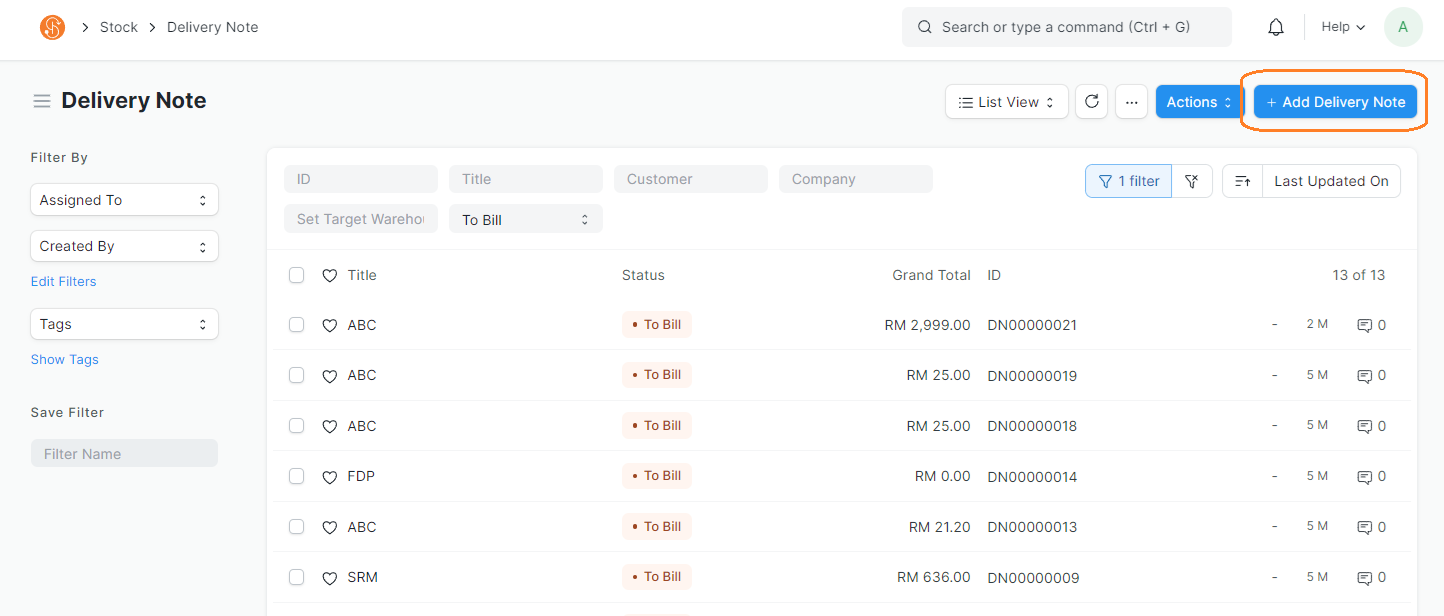
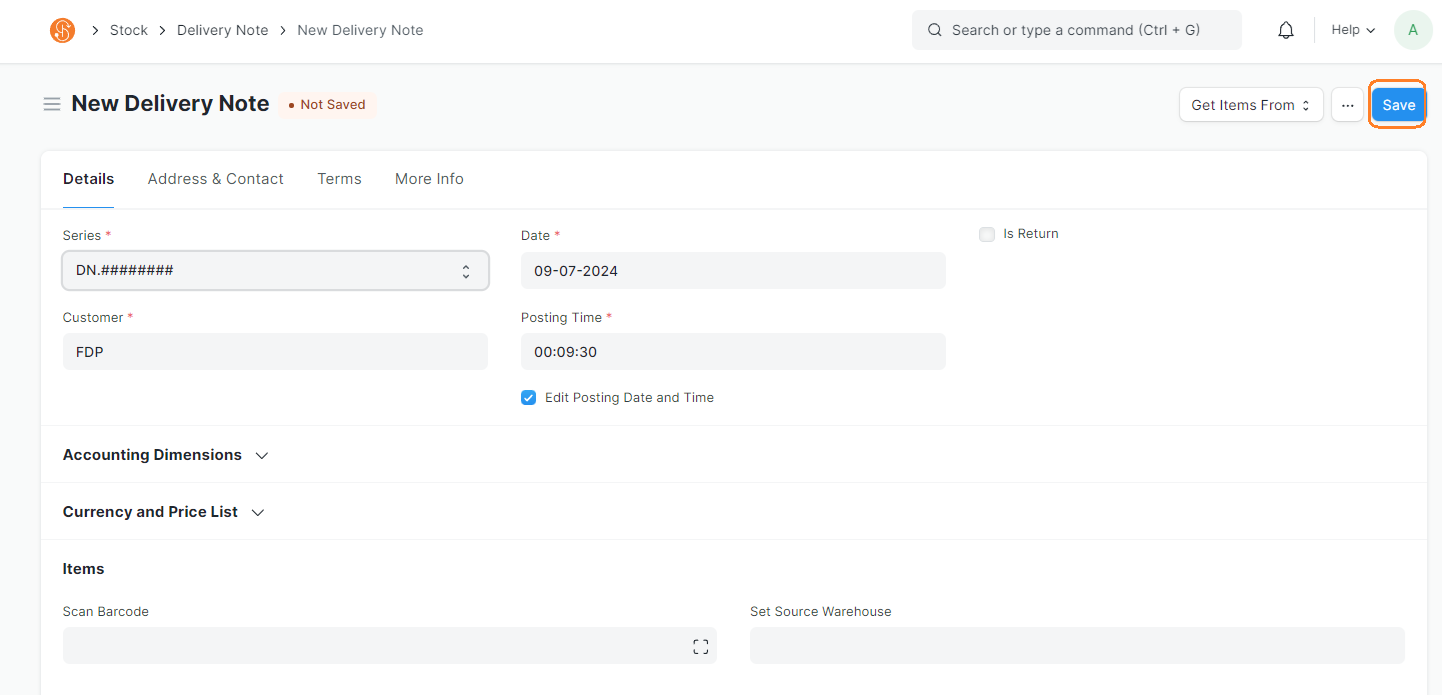
1. Go to Delivery Note List View and click Add Delivery Note
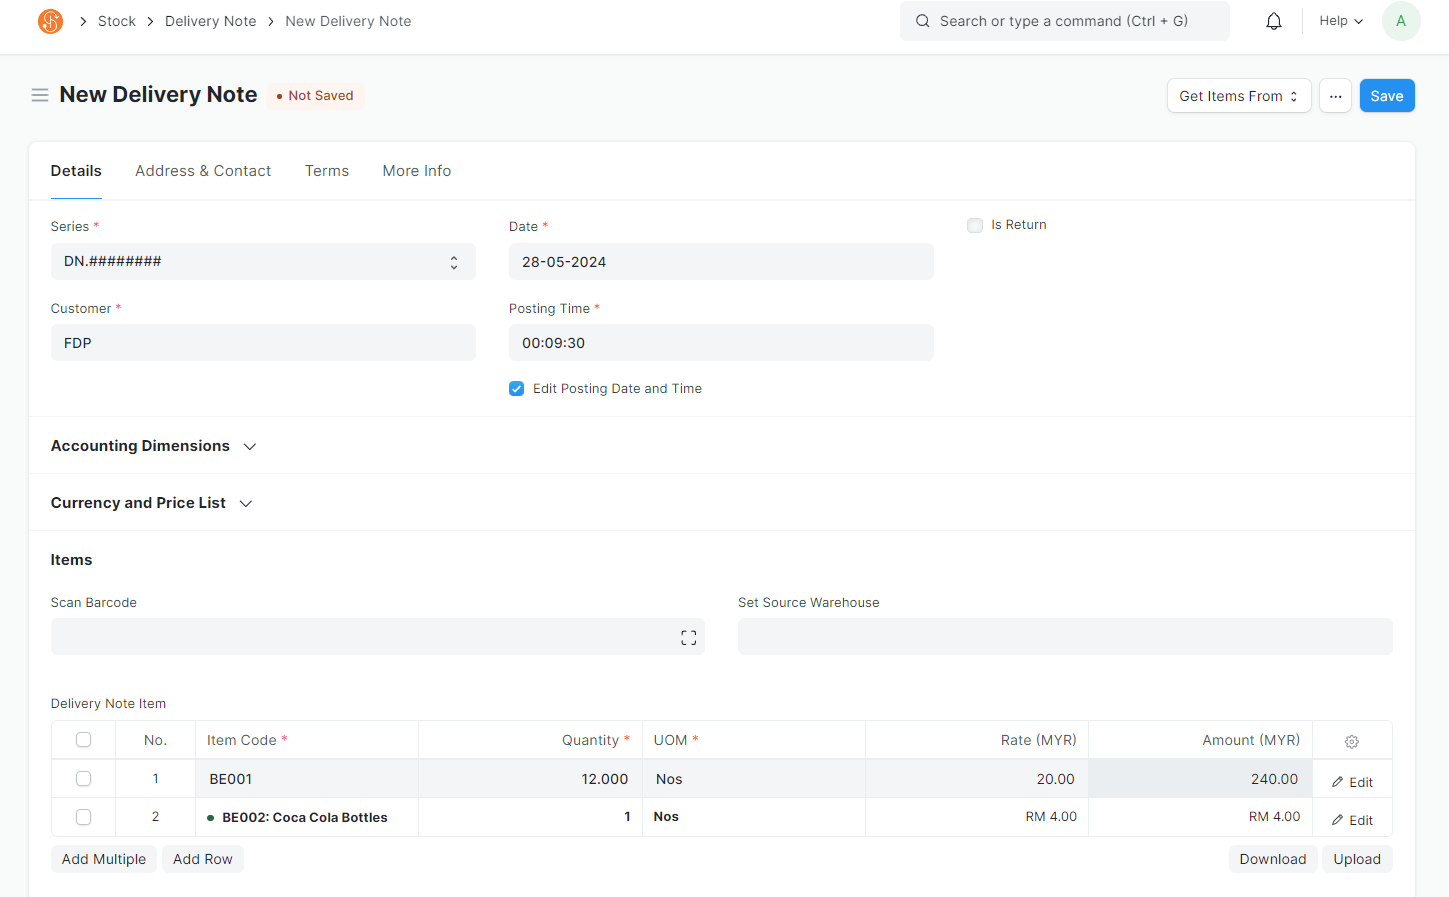
2. In the Delivery Note, choose the following
Note: Fields with a red asterisk indicates that it is Mandatory
- Series: Defaulted to DN.########
- Customer: Select Customer goods are being returned to
- Posting Date: Set to current date
- Posting Time: Set to current time
- Edit Posting Date and Time: To edit the Posting Date and Time, tick this checkbox
- Set Source Warehouse: If all Items are being issued out from the same Warehouse (Storage Location), you may use the Set Source Warehouse field. When selecting this, it will auto-select the Warehouse in the Items table. If Items are issued out from different Warehouses, you may select them in the Warehouse in the Item table

-
- Scan Barcode: You may select the Items to be brought in, by Scanning The Item Code QR Code
Note: Item's Item Code must be maintained in the Item's Barcode field
- Item Code: Items that are returned to customers can be selected in the Item Code field in the Delivery Note Item table
- Qty: Enter the quantity received. If Items are scanned via Scan Barcode, the Qty will adjust accordingly as per the no. of scans. However, the Qty can be adjusted manually as well
- Add Row: To add more line items in the Delivery Note Item table.
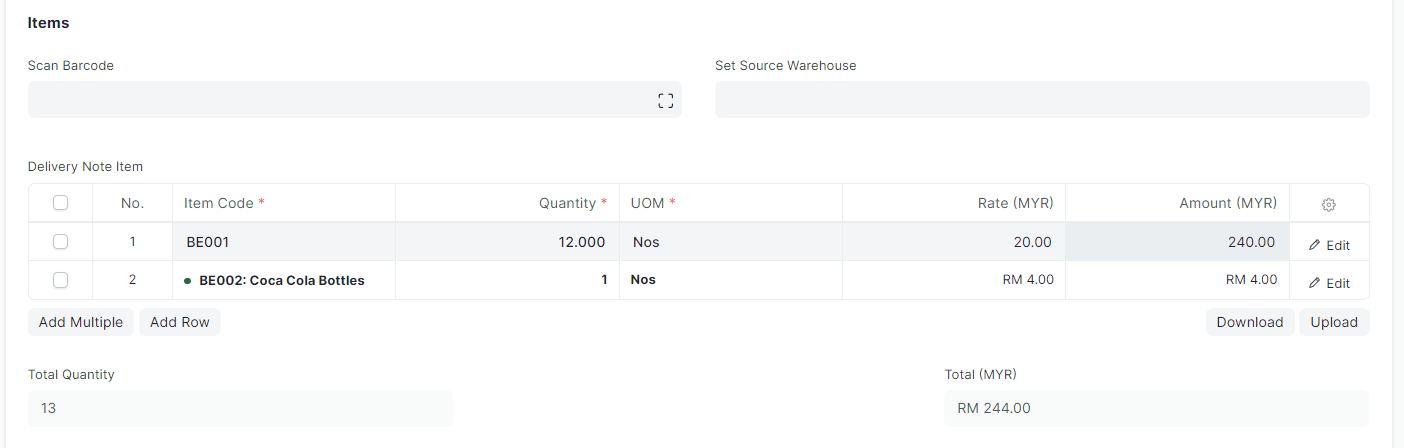
- To delete rows, check the checkbox on the left and a Delete button will appear. Click on the button to delete the row

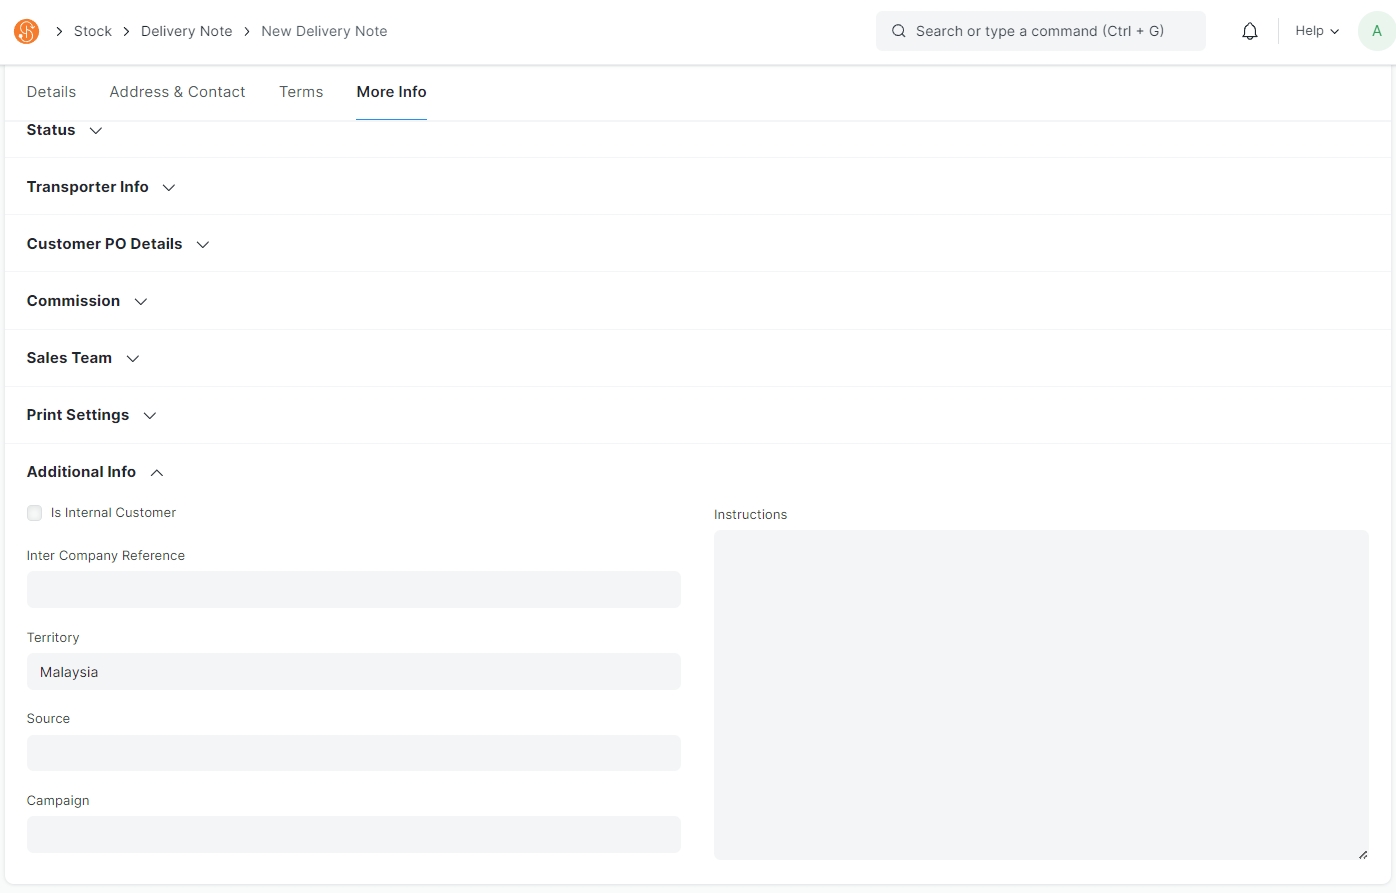
- Instructions: You have an option of adding in Instructions in the Delivery Note as well. Go to the More Info Tab to find the field
3. Save Delivery Note by clicking on Save
4. If Delivery Note is successfully saved, the Delivery Note status will be changed to Draft and Delivery Note Document ID is created
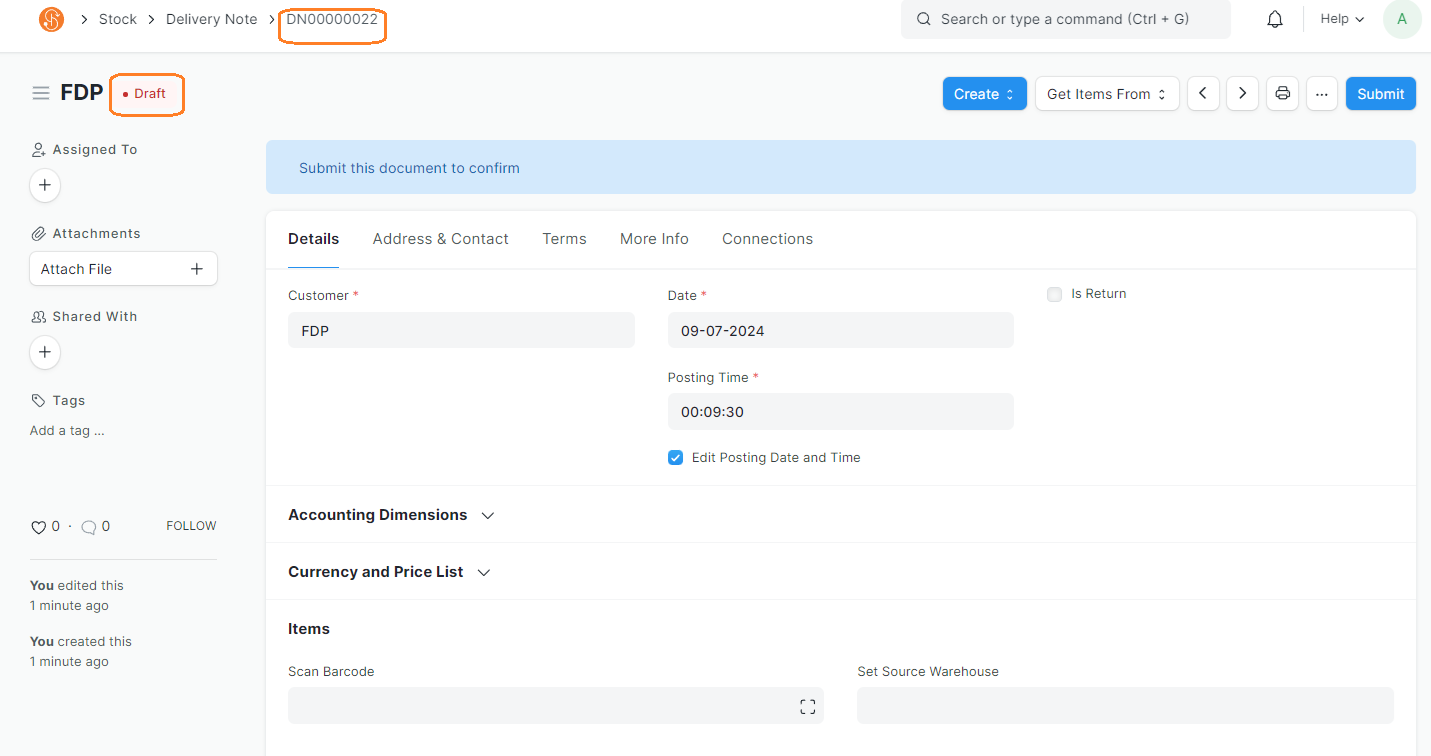
5. Submit Delivery Note once all information is confirmed by clicking on Submit
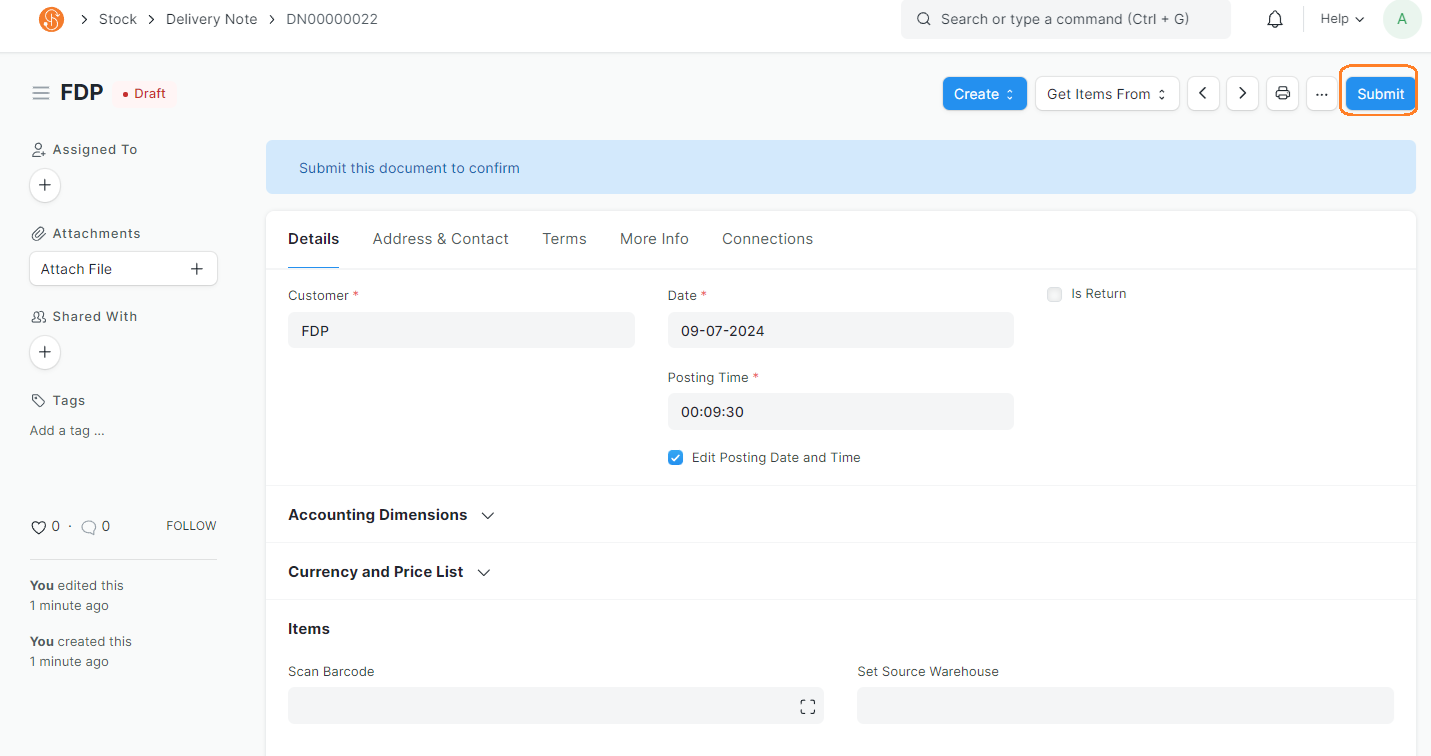
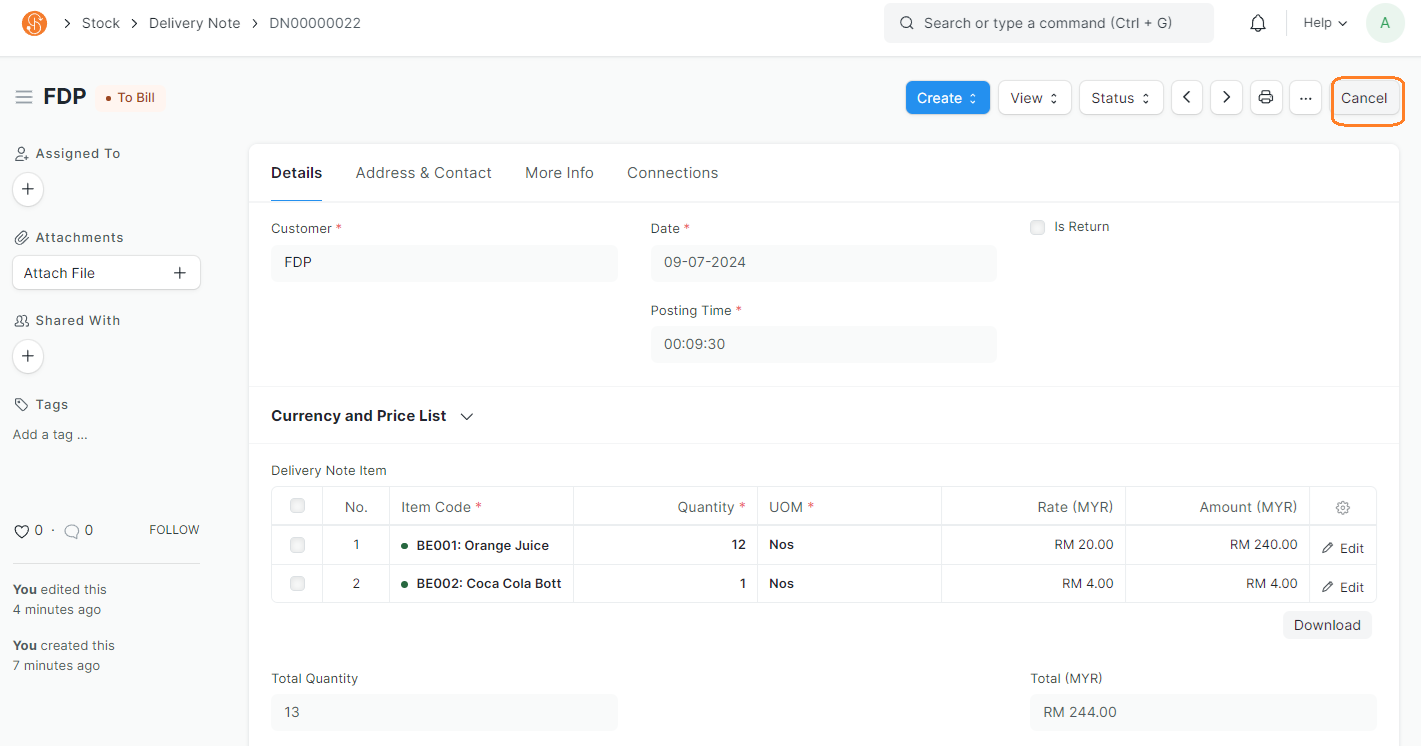
6. Once Delivery Note is submitted, the Delivery Note status will be changed to To Bill
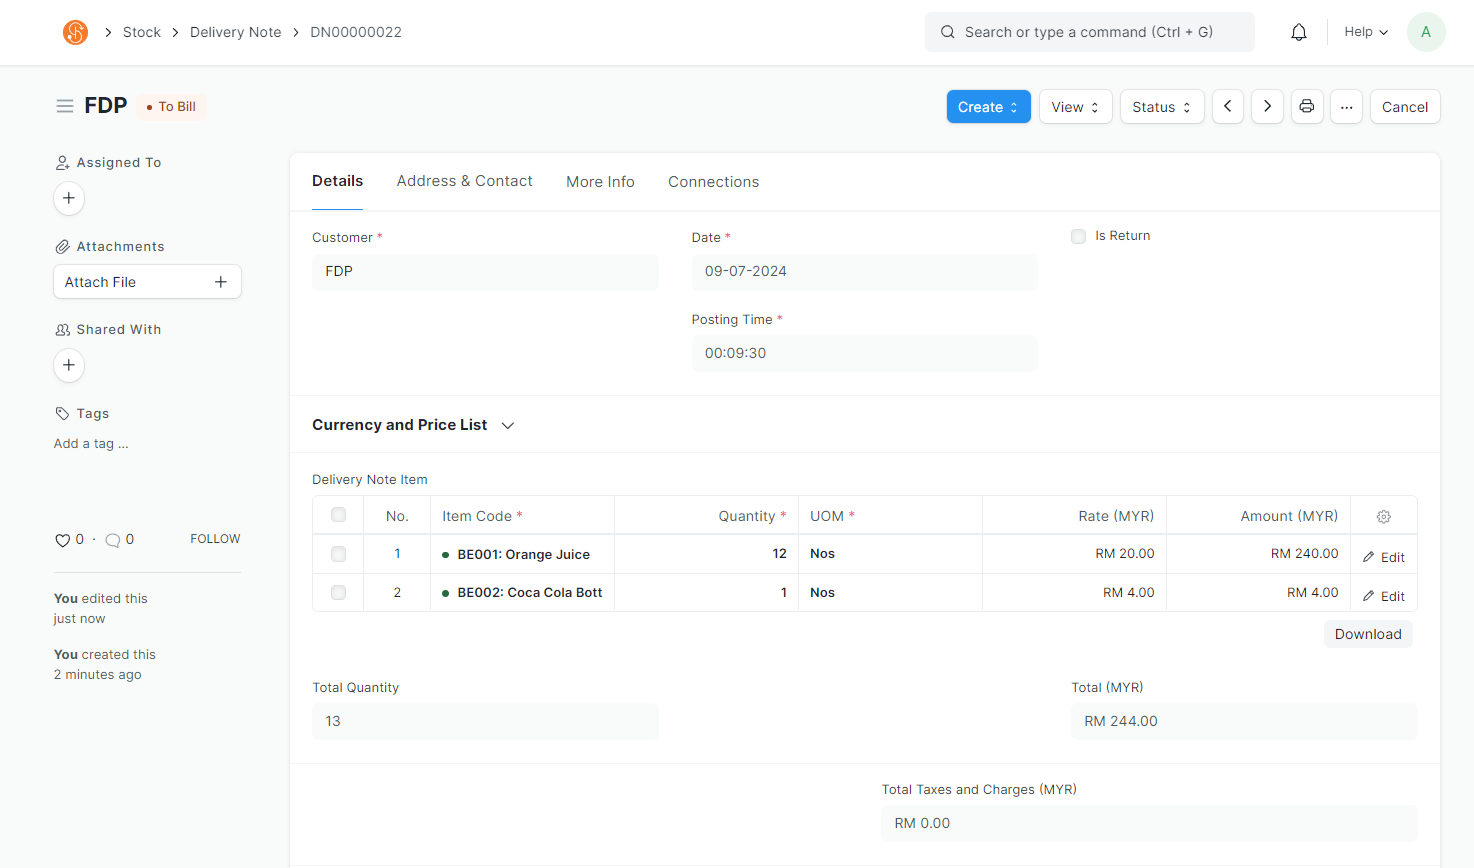
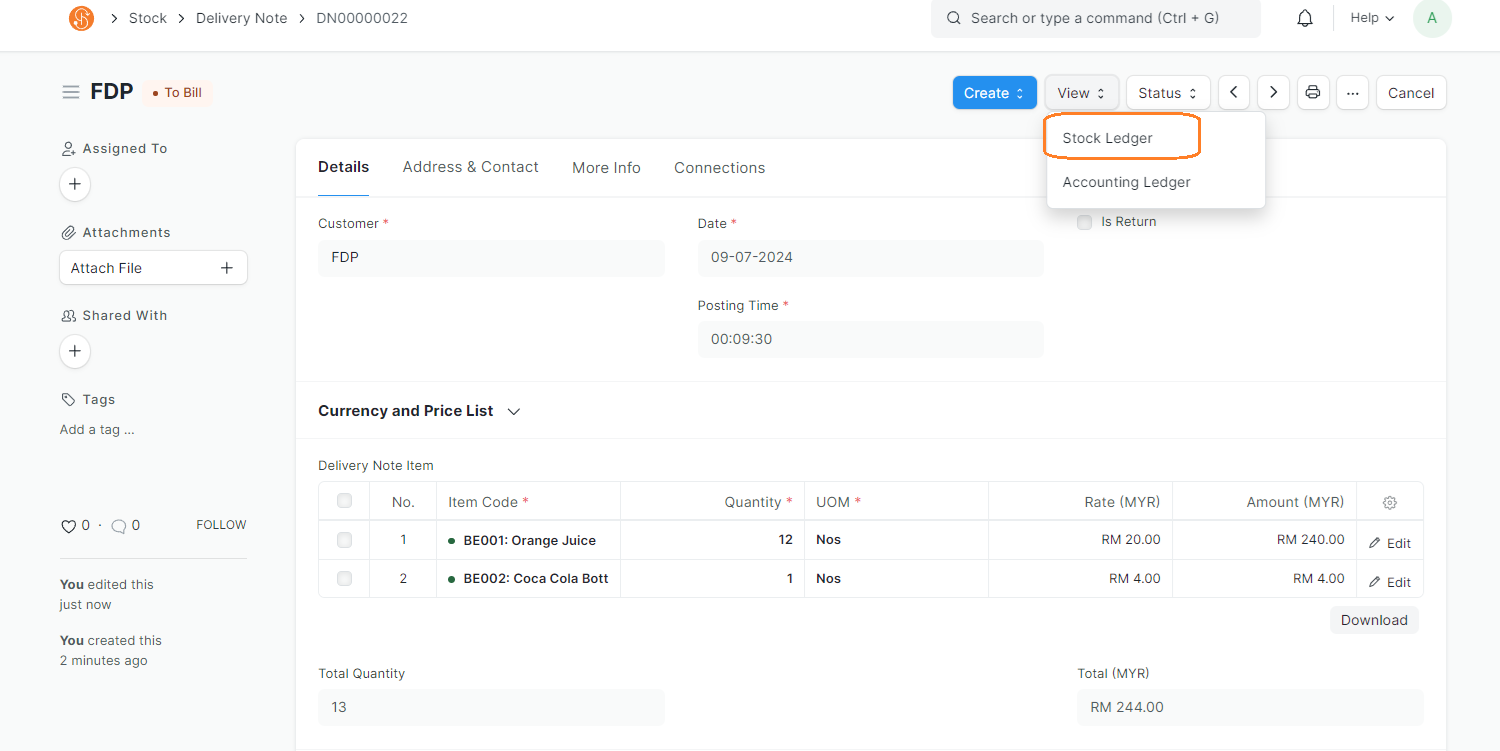
6. View > Stock Ledger to view the stock movement from the Source Warehouse
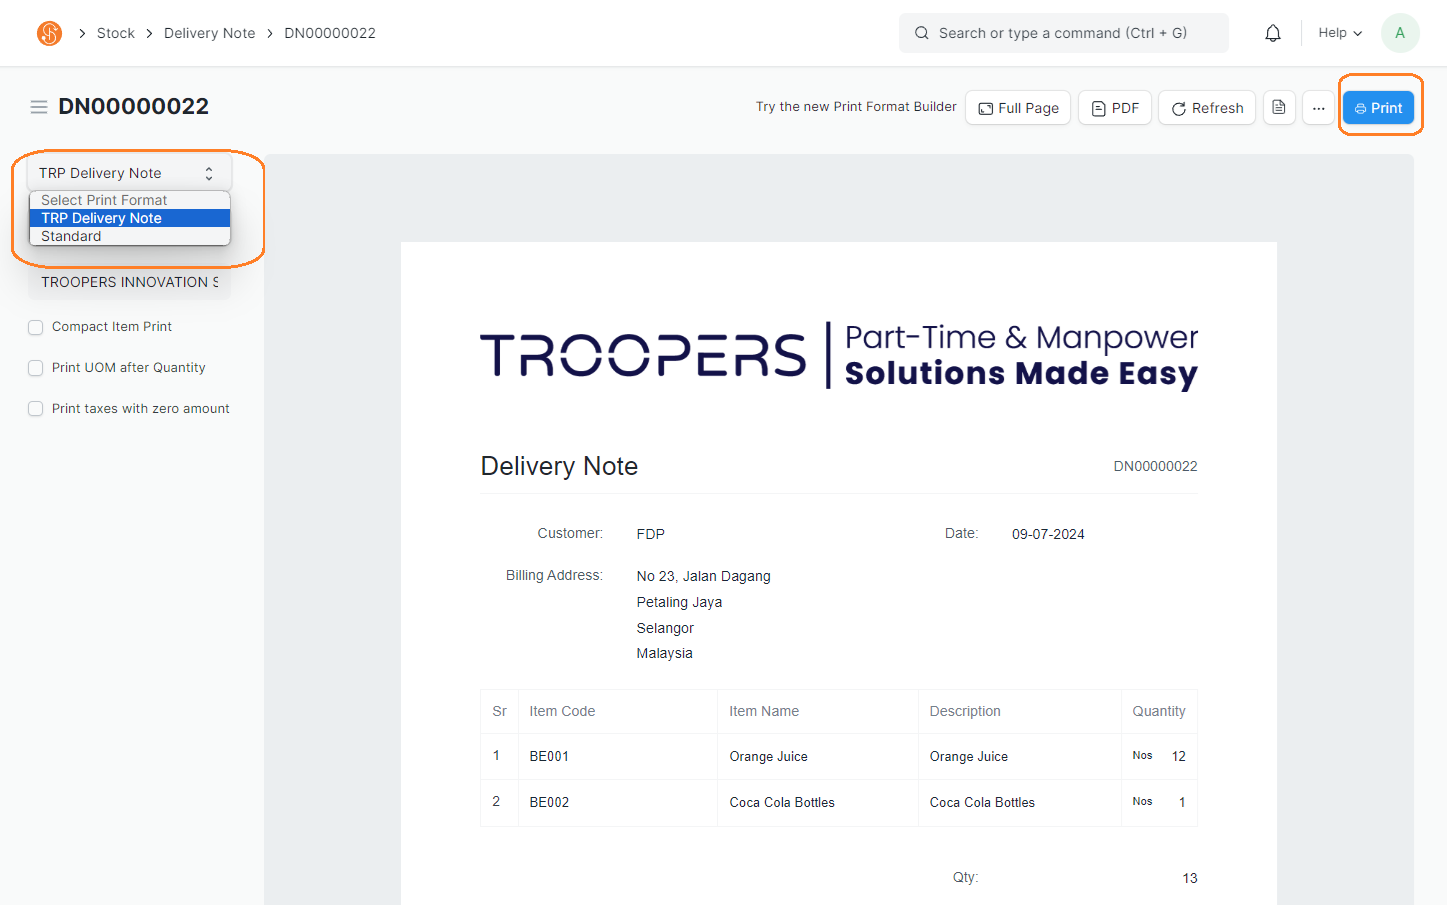
7. Print out Delivery Note Issue Form by clicking on Print
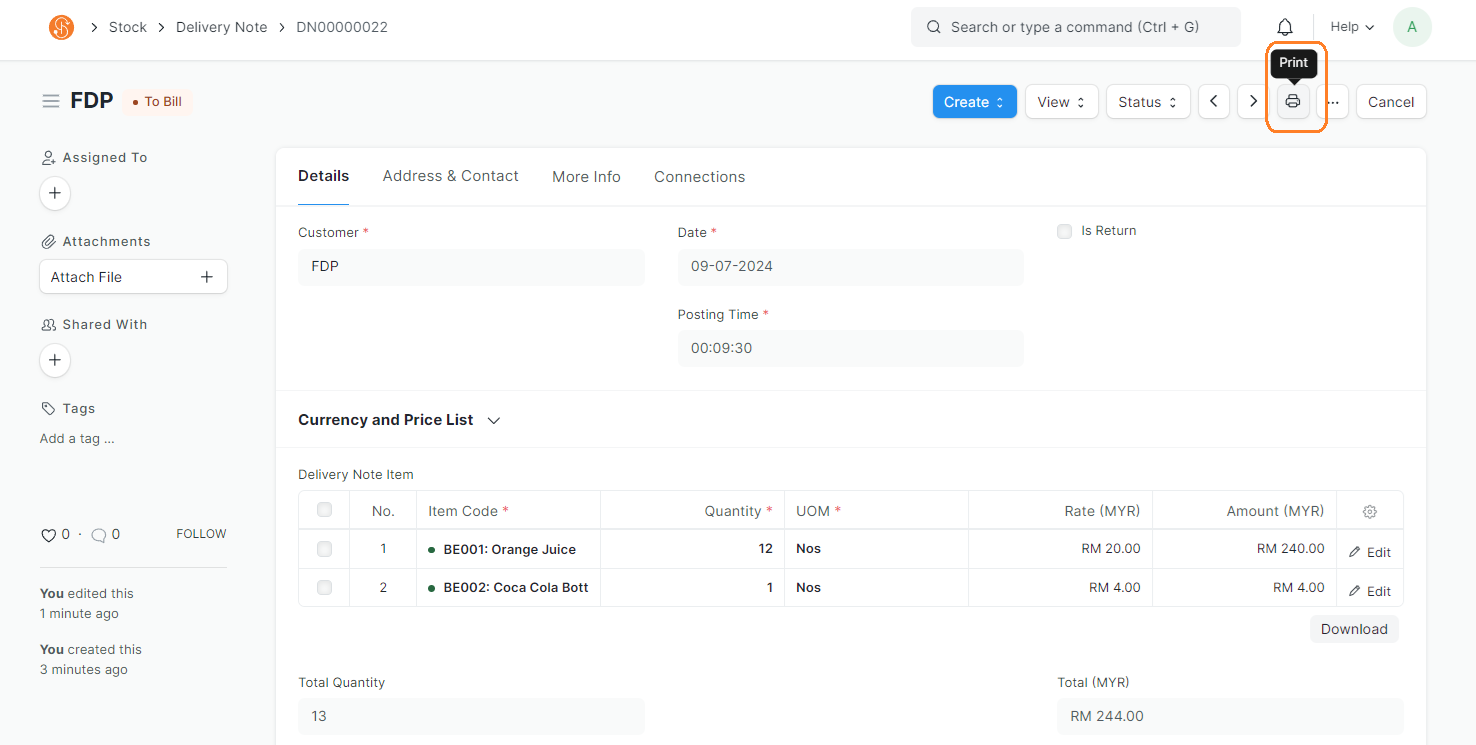
8. In the Print view, you may
- select the Print Format TRP Delivery Note
- To print out the Customer Return form, select this Print Format. This is to print out a copy of the issue form, which will indicate the Customer details and Items returned, including its quantity
- To print out the Customer Return form, select this Print Format. This is to print out a copy of the issue form, which will indicate the Customer details and Items returned, including its quantity
- To print, click on Print button
9. To cancel a submitted Delivery Note (Status = To Bill), click on Amend and cancel accordingly. The process of cancelling and amending the Delivery Note is similar to cancelling and amending a Stock Entry, where a revision number will be generated as per the number of revisions made from the original Stock Reconciliation. The original and amended Delivery Note will also be linked to each other for reference.
Stock Reconciliation
Stock Reconciliation is the process of counting and evaluation products or goods. The objective is to update the number of specific items in a warehouse as of a specific time, to ensure the actual physical stock count is tallied with the system's inventory.
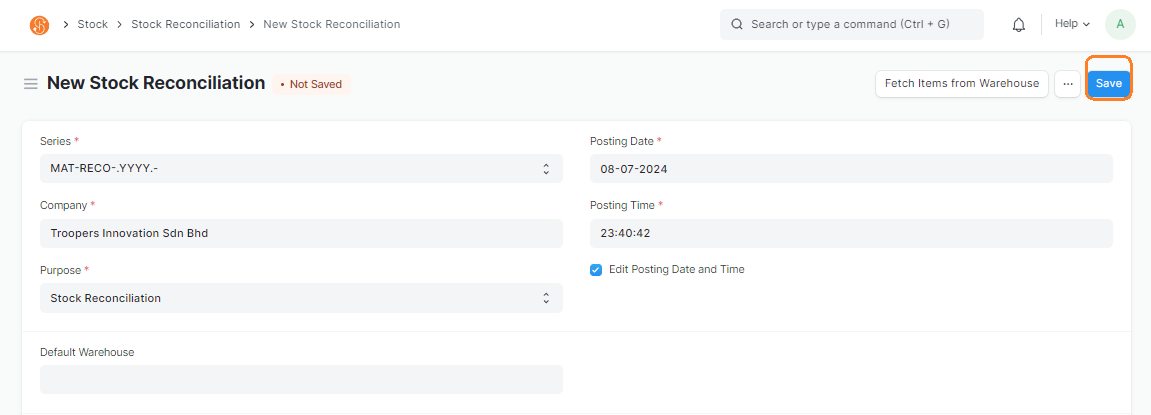
Create New Stock Reconciliation
Document Path: Stock > Tools > Stock Reconciliation
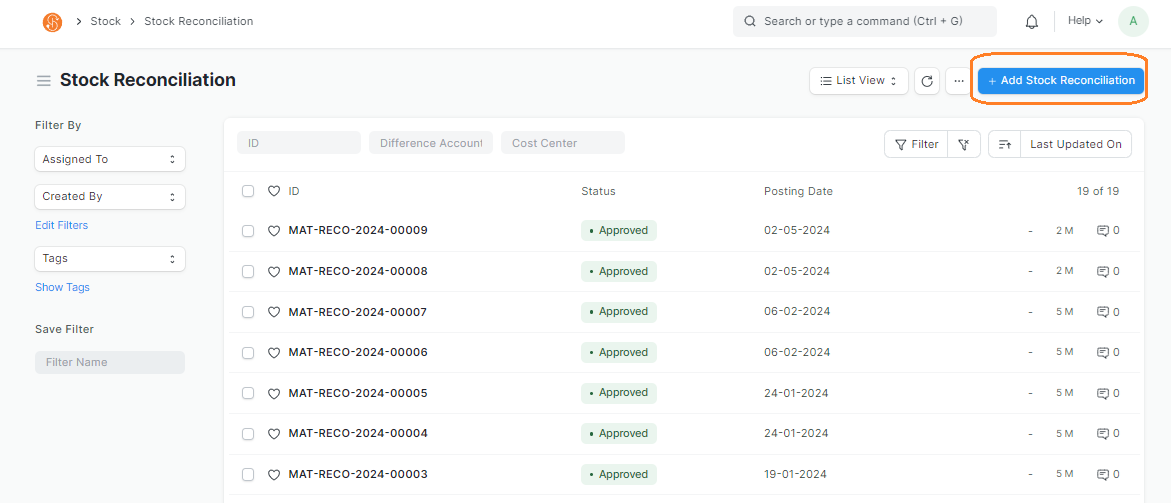
1. Go to Stock Reconciliation List View and click Add Stock Reconciliation
Stock Reconciliation can be adjusted using 2 methods:
- By Item
- By Warehouse
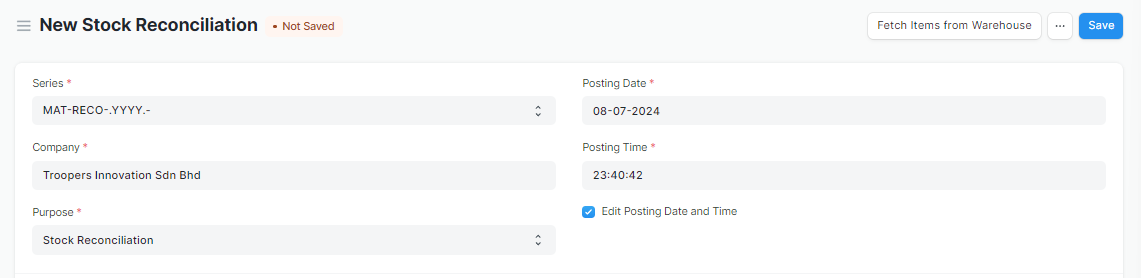
2. In the Stock Reconciliation, choose the following
- Series: Defaulted
- Purpose: Stock Reconciliation
- Posting Date: Set to current date
- Posting Time: Set to current time
- Edit Posting Date and Time: To edit the Posting Date and Time, tick this checkbox
Stock Reconciliation By Item
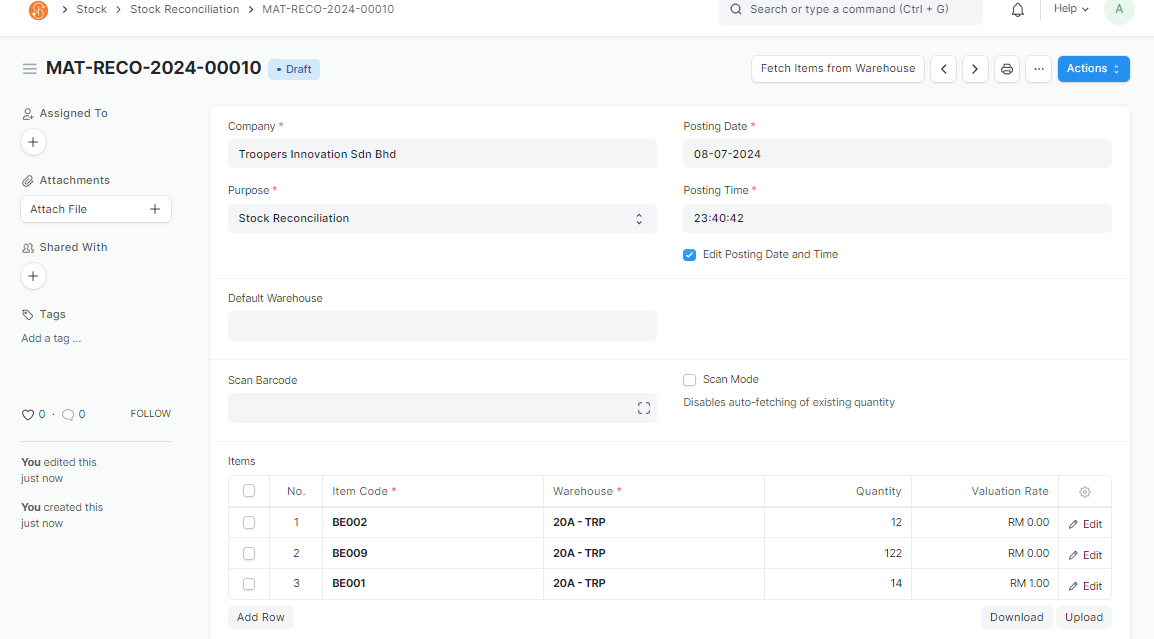
- In the Stock Reconciliation Items table, choose the following
Note: Fields with a red asterisk indicates that it is Mandatory
- Item Code
- Warehouse: Storage Location of the Items being adjusted
- When Item Code and Warehouse are selected, the system will fetch the current Quantity as per the Posting Date and Posting Time
- Quantity: Enter the updated quantity. For example, if your physical stock is 10 Nos, set Quantity as 10
- Valuation Rate: Cost of Items. If you would not like to keep track of the Valuation Cost, you can just set as '1'.
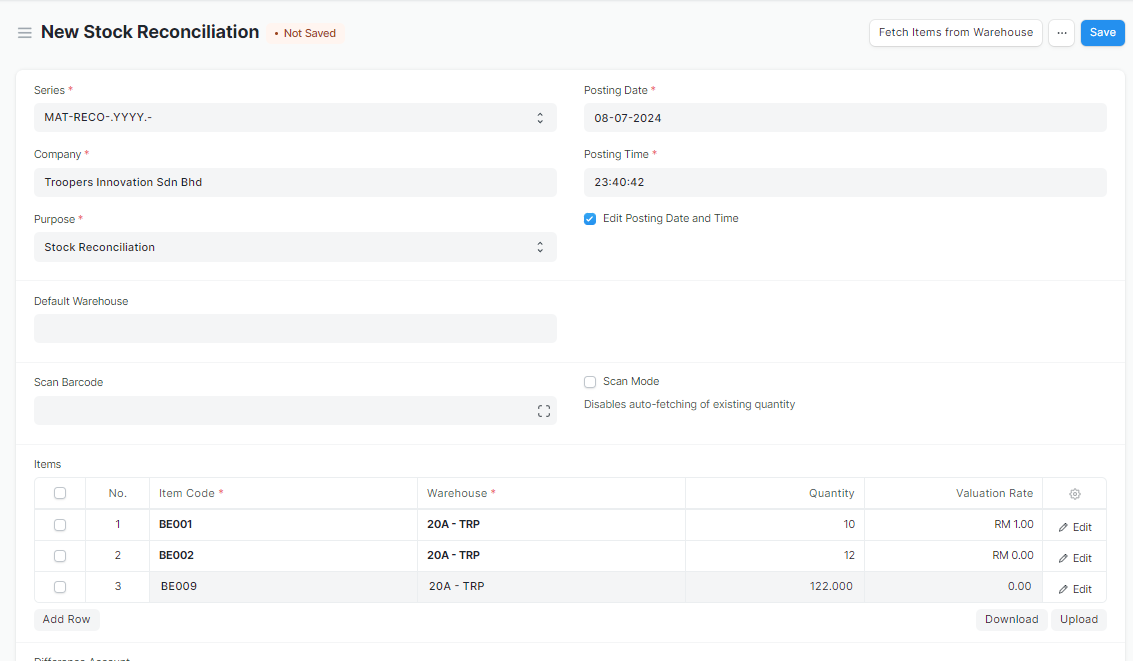
- Scan Barcode: You may select the Items to be brought in, by Scanning The Item Code QR Code
Note: Item's Item Code must be maintained in the Item's Barcode field
- To delete rows, check the checkbox on the left and a Delete button will appear. Click on the button to delete the row

Stock Reconciliation by Warehouse
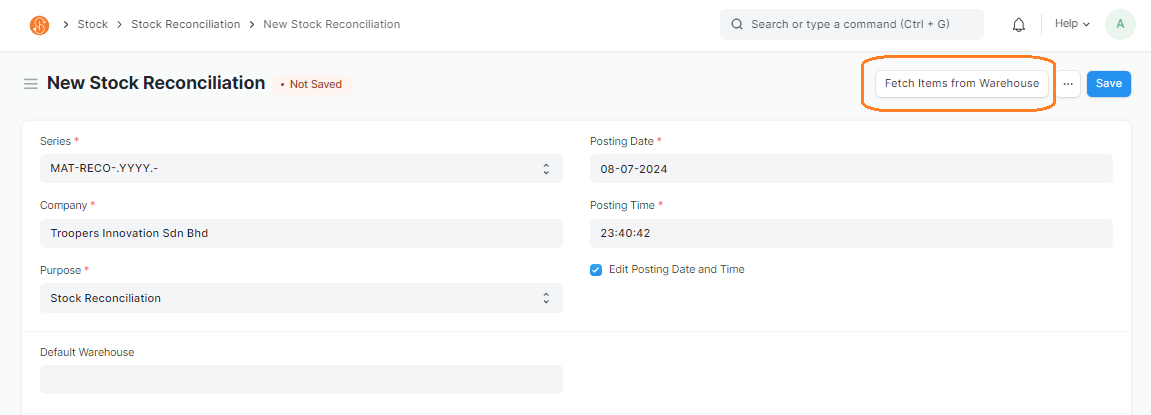
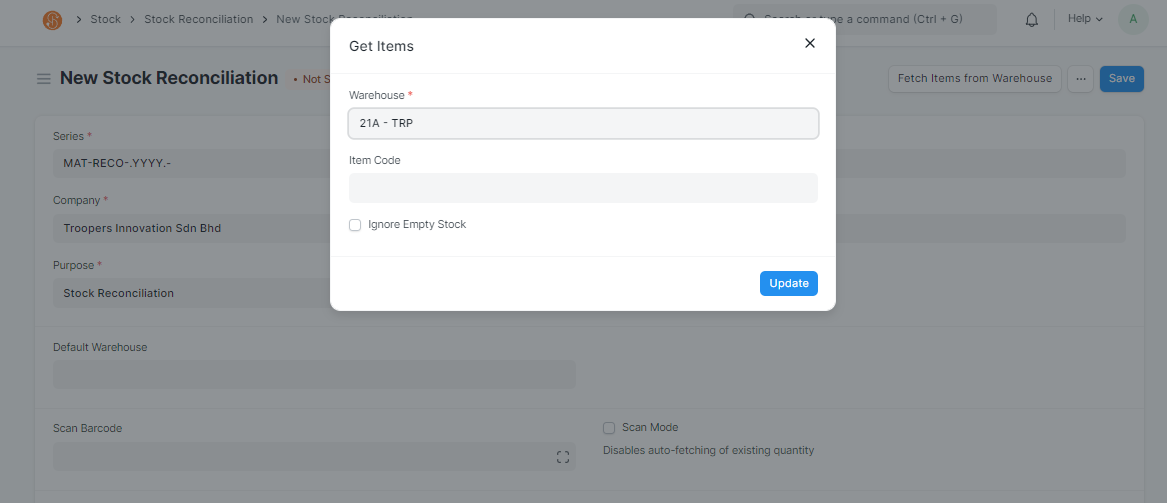
- In the Stock Reconciliation, you may also process by Warehouse, i.e select all Items that are currently in the Warehouse. To do so, click on Fetch Items from Warehouse
- Once clicked, a pop-up as below will appear, allowing you to choose:
- Warehouse: This allows you to select which Warehouse to process the Stock Reconciliation
- Item Code: If you'd like to process Stock Reconciliation for a specific Item, you may select it in this field. This is optional
- Ignore Empty Stock: If this checkbox is ticket, it will exclude all Items that have zero stock in the Warehouse selected
- Once selected, click on Update
- Items will be updated accordingly in the Items table, you may adjust the table accordingly and delete rows that are not necessary
3. Save Stock Reconciliation by clicking on Save
4. If Stock Reconciliation is successfully saved, the Stock Reconciliation status will be changed to Draft and Stock Reconciliation Document ID is created
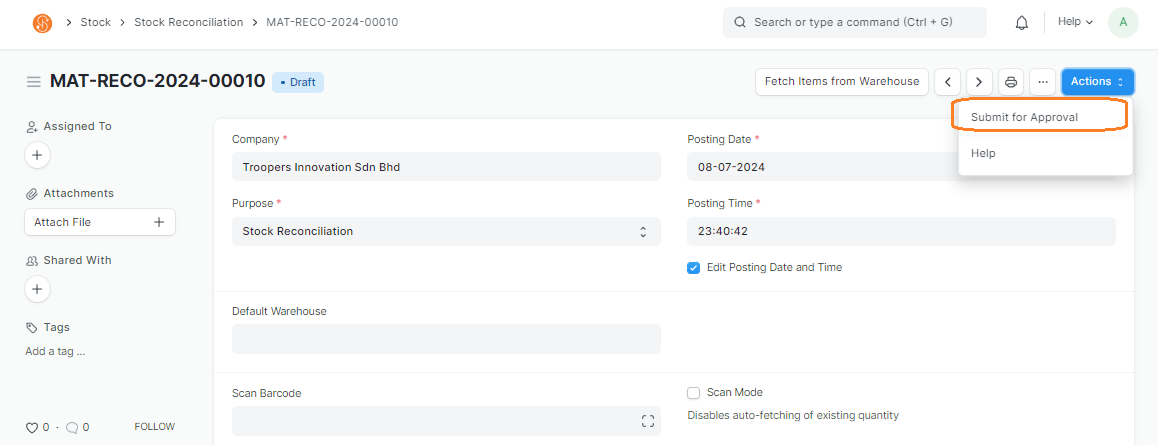
5. There is a 1-level Approval Workflow in the Stock Reconciliation, which will require an approval from the manager. Once the user saves the Stock Reconciliation for the first time, they will have to Submit for Approval
- Once user clicks on Submit for Approval, document status will change to Pending Approval
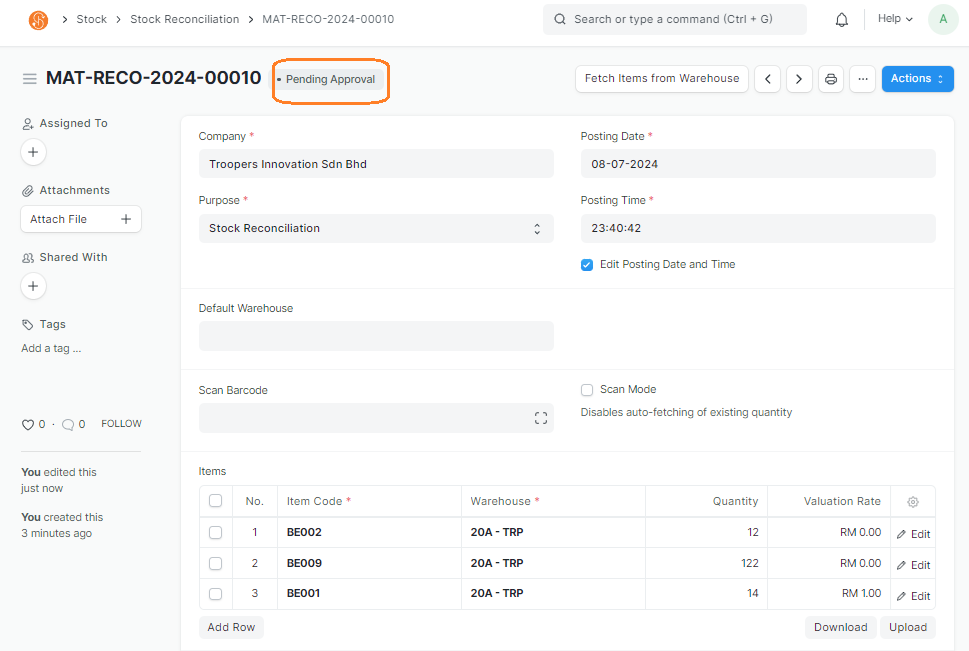
6. Managers will then have to Approve or Reject the document. To do so, they may search Stock Reconciliations that are in the Pending Approval Workflow State. To filter, they may click on the Status column (as per image), or filter manually using the filter function

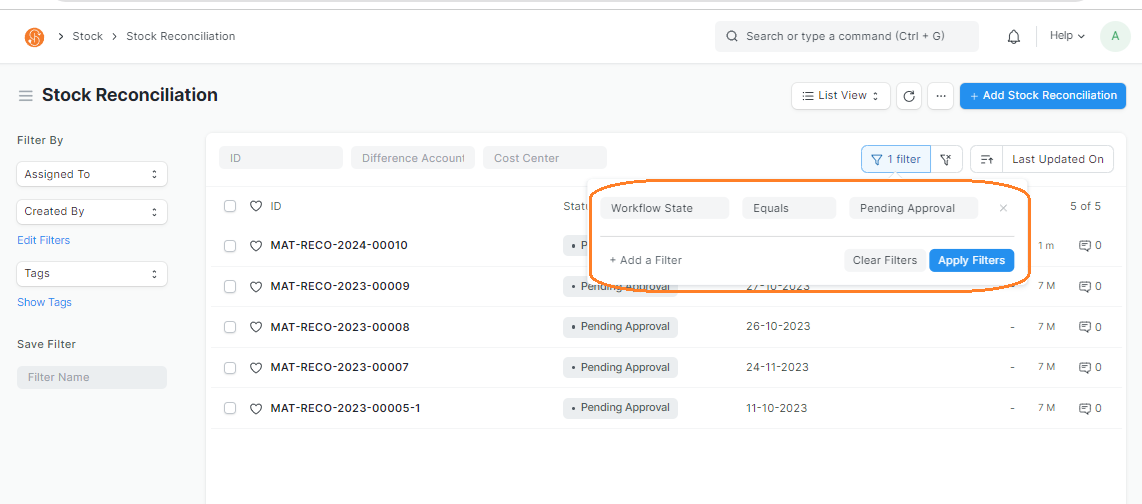
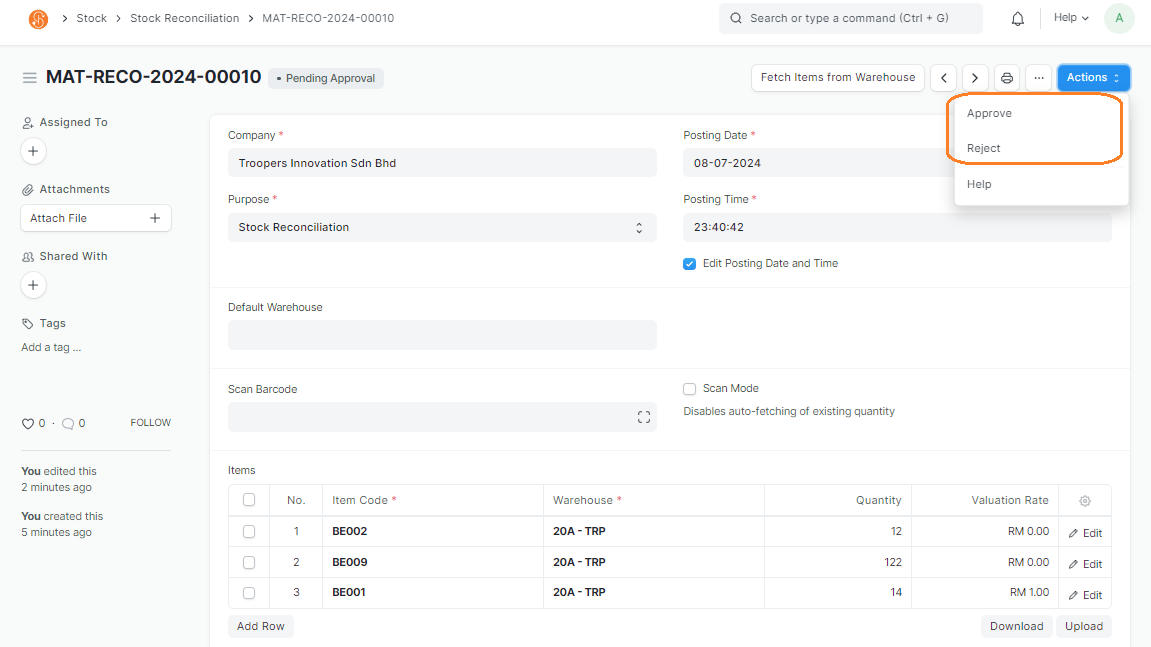
7. Once a Stock Reconciliation with Pending Approval status is selected, user must either Approve or Reject
- If manager clicks on Reject, Stock Reconciliation status will change to Rejected and Stock will not be updated. No Stock Ledger will be posted. User will then have the option to adjust and resubmit or leave it as Rejected
- If manager clicks on Approve, Stock Reconciliation status will change to Approved and Stock will be updated, i.e. document is submitted. Stock Ledger will also be posted.
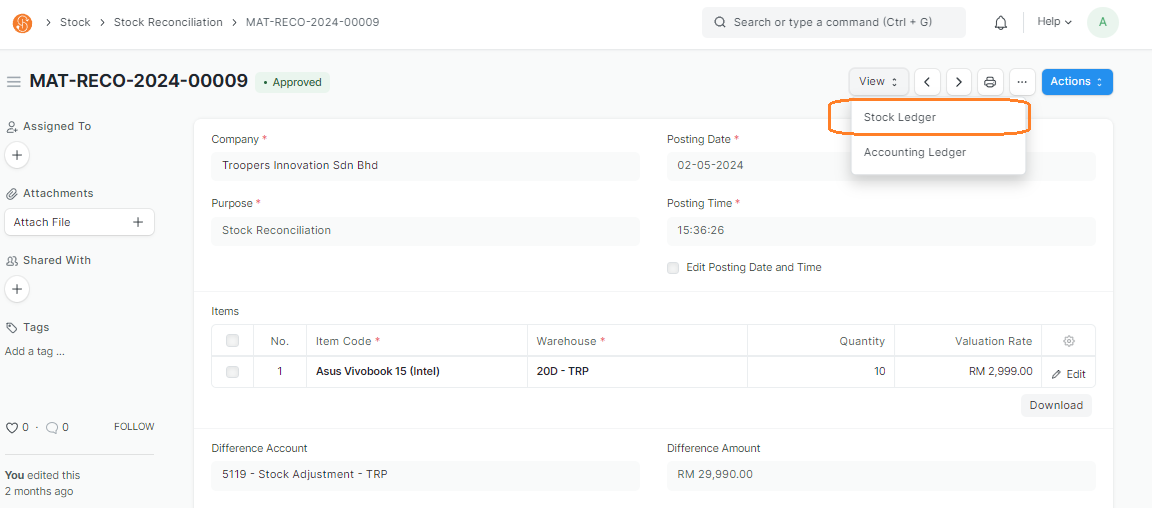
8. For Approved Stock Reconciliations, users can View > Stock Ledger to view the updated stock.
9. To cancel an Approved Stock Reconciliation, you may do so by clicking on Cancel. The process of cancelling and amending the Stock Reconciliation is similar to cancelling and amending a Stock Entry, where a revision number will be generated as per the number of revisions made from the original Stock Reconciliation. The original and amended Stock Reconciliation will also be linked to each other for reference.
Stock Reports
Below are a list of useful Stock Reports that can be used in SMURPS
Stock Ledger Report
Document Path: Stock > Stock Reports > Stock Ledger
- Stock Ledger Report is a detailed record that keeps track of stock movements of inventorized Items for a company.
- Inward or outward transactions in a Warehouse are recorded in the report. In Qty shows quantity coming in, and Out Qty shows quantity issued out
- You may click on Voucher # to open the document this transaction was recorded from, i.e. Stock Entry, Delivery Note and Stock Reconciliation
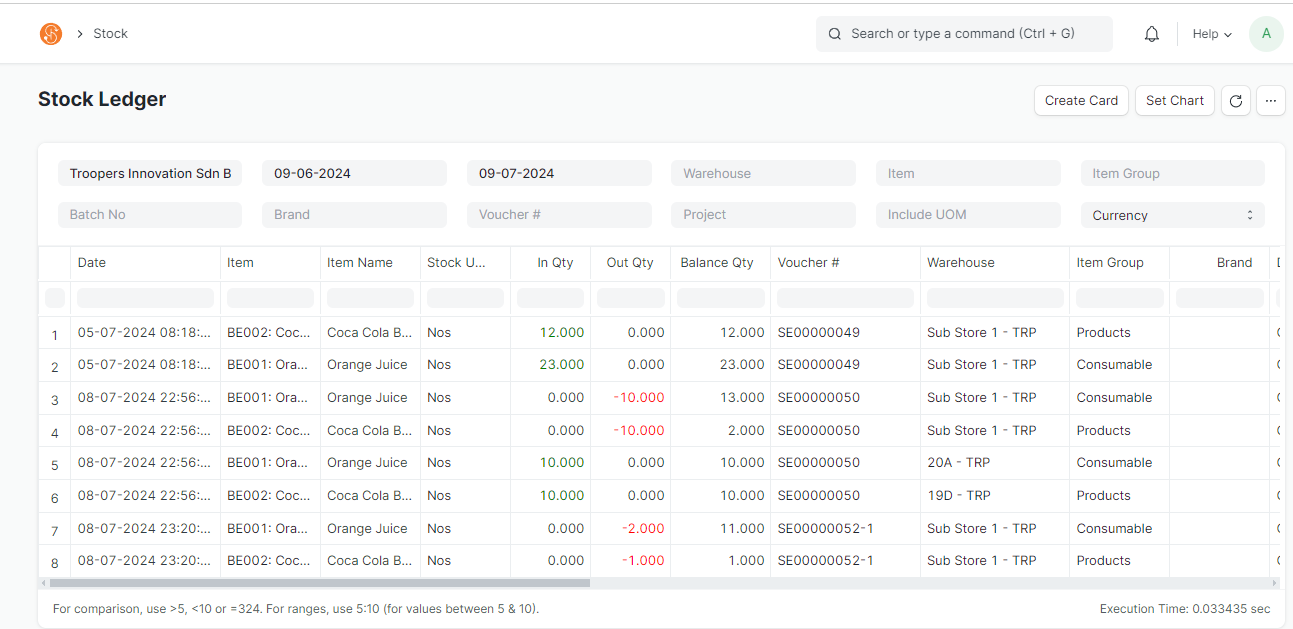
- You may also filter according to the:
- Transaction Date
- Warehouse
- Item Code
- Item Group
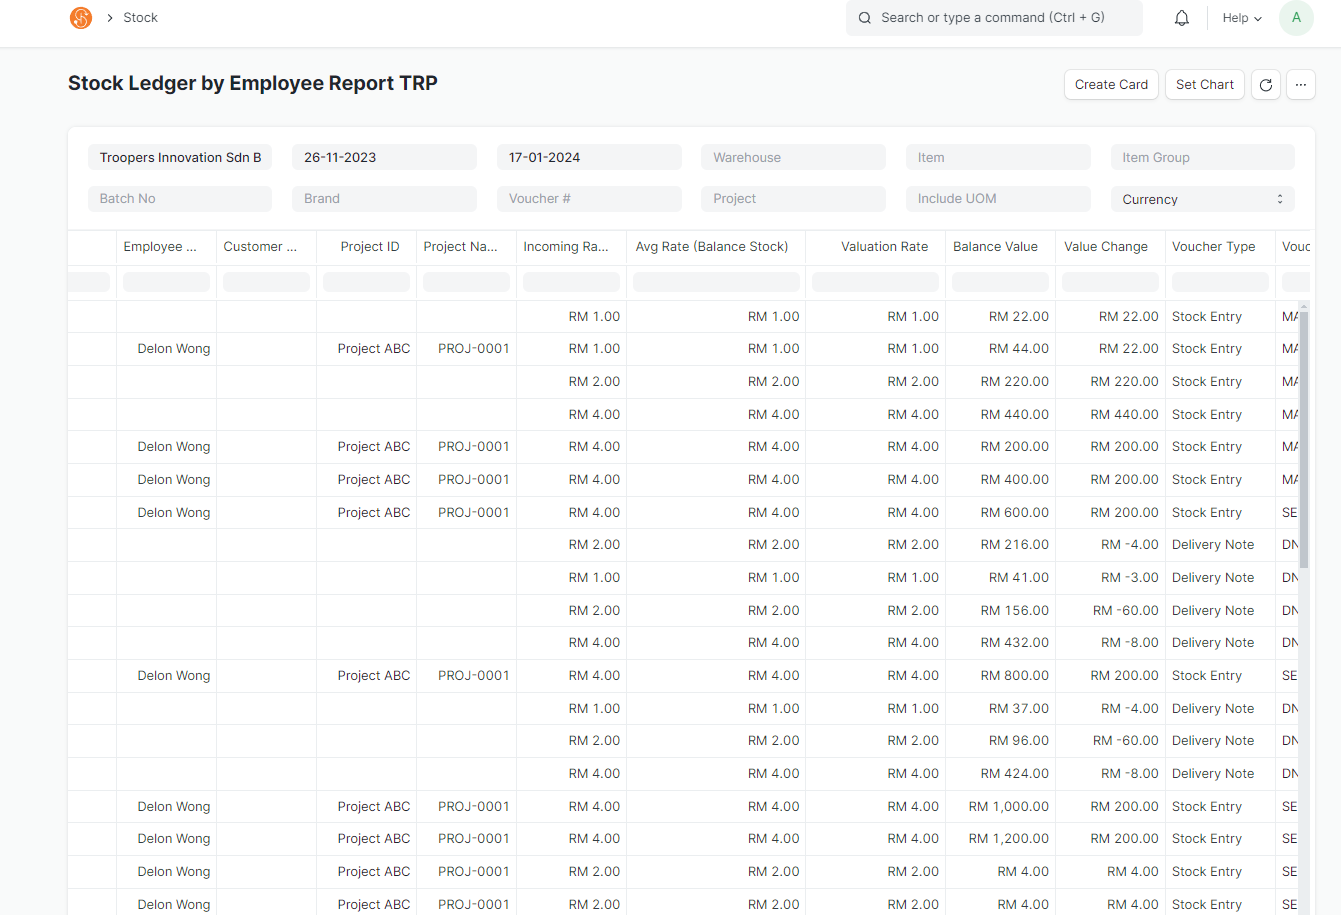
Stock Ledger by Employee Report TRP
Document Path: Stock > Stock Ledger by Employee Report TRP
- Stock Ledger by Employee Report is a customize Stock Ledger Report that shows custom information for Troopers such as Customer, Project ID and Employee
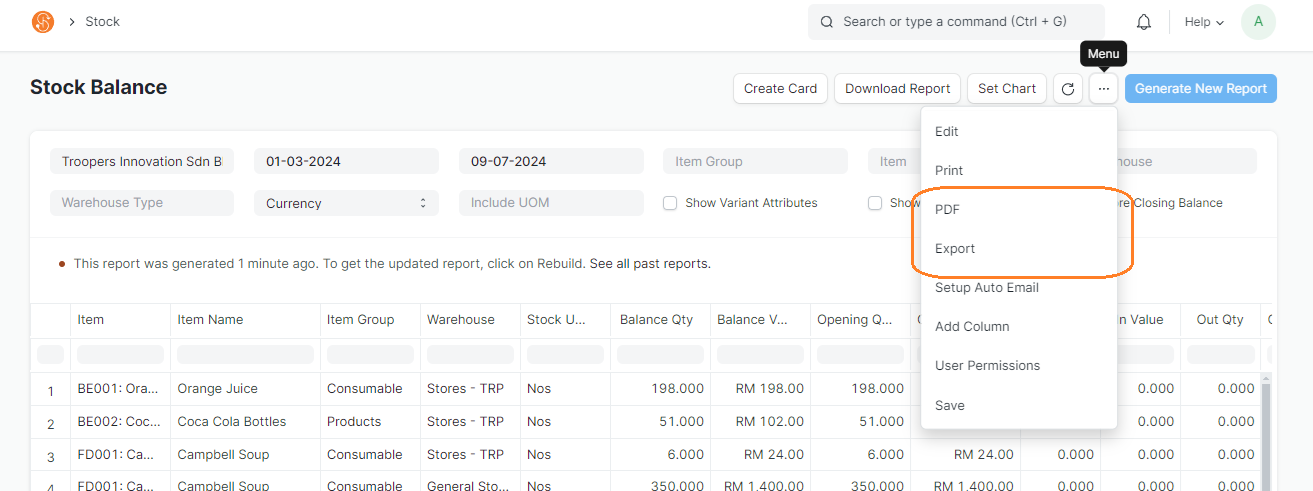
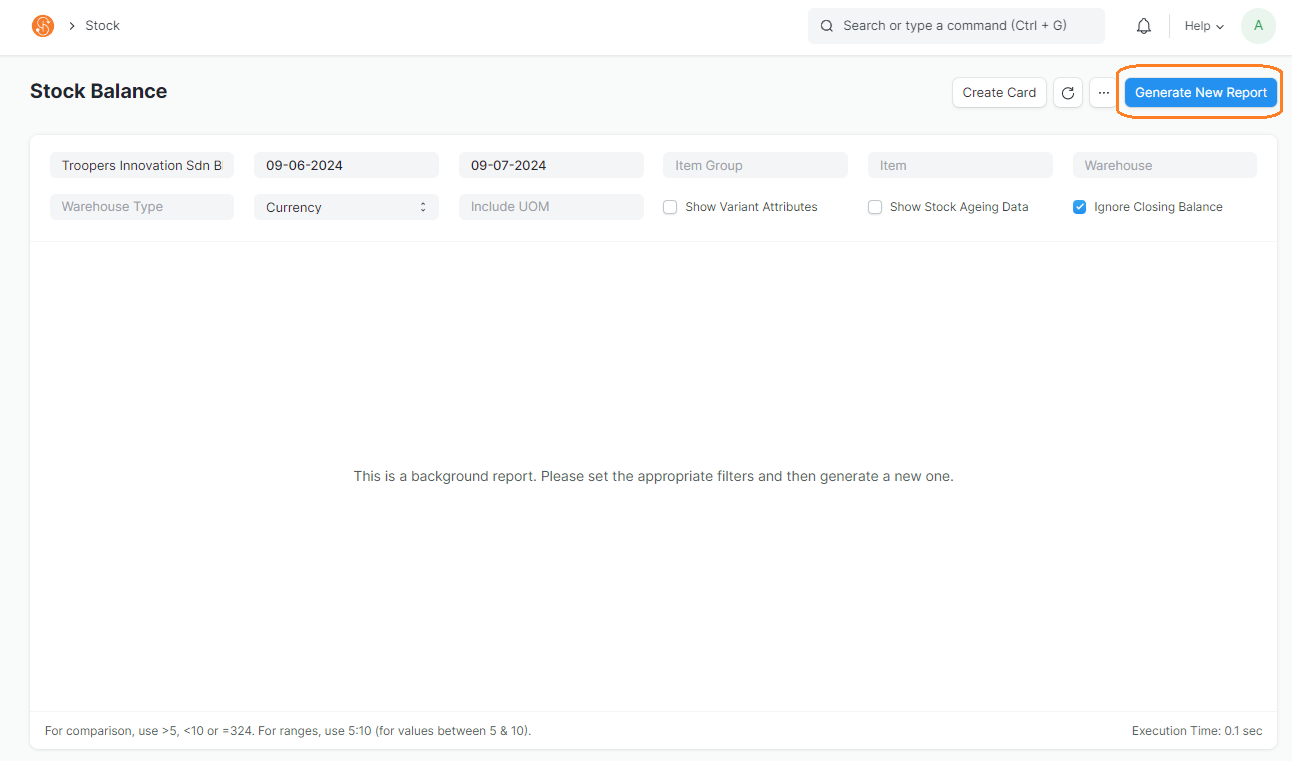
Stock Balance
Document Path: Stock > Stock Reports > Stock Balance
- Stock Balance report allows you to view the current stock balance quantity in a warehouse in the system
- Click on Generate New Report to generate a report. You may filter the Stock Balance accordingly to Date, Item, Item Group and Warehouse
- To view the current inventory balance quantity, view the Balance Qty column
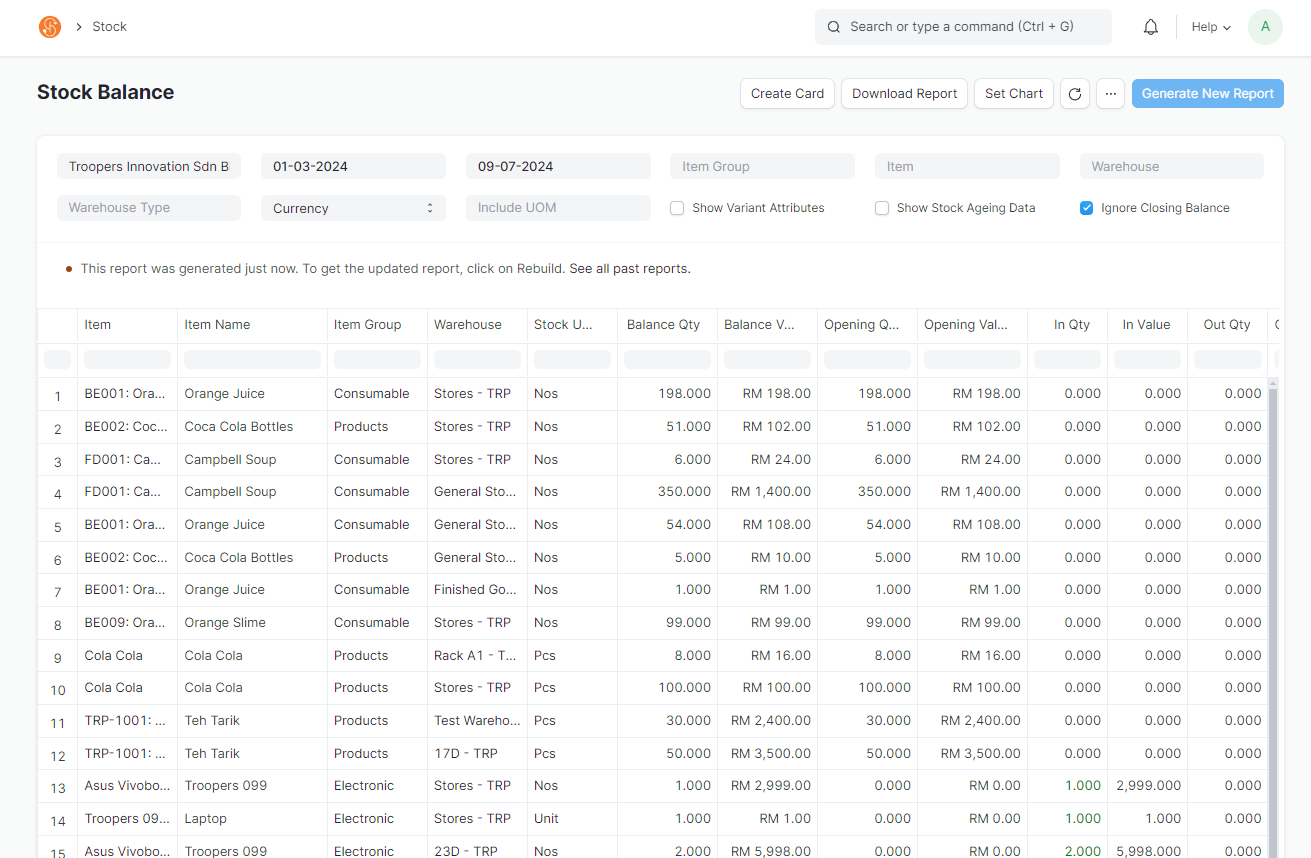
Note: These stock reports can be exported into Excel or PDF. To do so, click on Menu > Export or PDF